
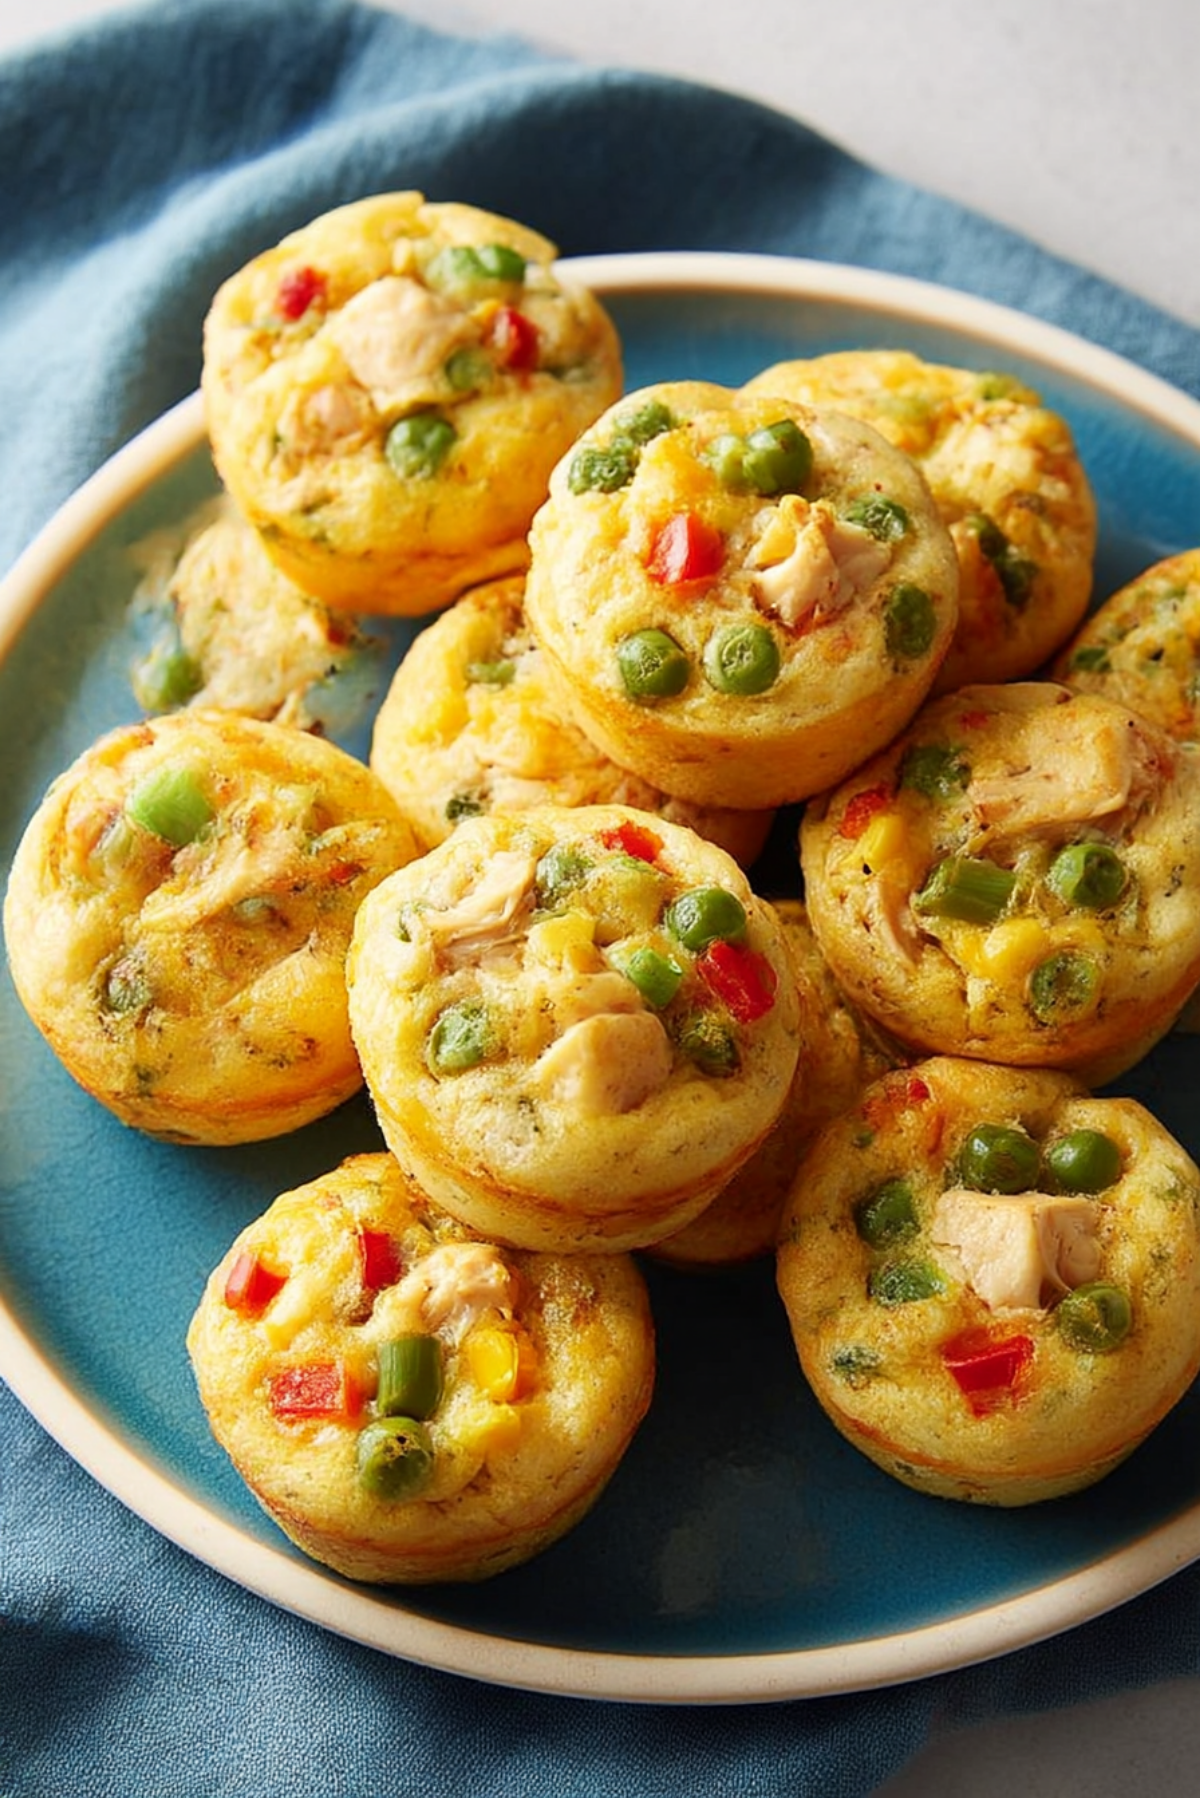
These Chicken Pot Pie Muffins are little bites of comfort in muffin form. Imagine all the classic cozy pot‑pie goodness—tender chicken, mixed vegetables, rich creamy sauce—enveloped in a soft biscuit or pastry cup, baked to golden perfection. Ideal for dinner or grab‑and‑go lunches, they’re fun, easy, and endlessly tasty.
Behind the Recipe
I first whipped these up one busy weeknight when I didn’t have the time or patience to make a full‑sized pot pie. I had leftover chicken and some frozen veggies, and decided to turn them into something handheld. The muffin tin method made them quick, portioned and fun to eat. They’ve since become a go‑to for casual dinners and maybe even party snacks.
Recipe Origin or Trivia
The classic chicken pot pie is a comfort food staple in the U.S., dating back to immigrants adapting meat and vegetable pies. Turning it into muffin‑sized portions is a modern twist—perfect for weeknight meals and portion control. Listing sites show how easy this version with biscuits or puff pastry has become. :contentReference[oaicite:0]{index=0}
Why You’ll Love Chicken Pot Pie Muffins
- Convenient: Pre‑portioned, no cutting into slices.
- Quick: Uses leftover cooked chicken plus biscuit or pastry cups.
- Versatile: Swap veggies, change crust style (biscuit, puff pastry, or homemade).
- Kid‑friendly: Fun shape, familiar savory flavour.
- Make‑ahead friendly: You can prep filling ahead and bake when ready.
Chef’s Pro Tips for Perfect Results
- Ensure chicken is in small, evenly sized pieces so each muffin cup has a good bite.
- Don’t overfill the crust cups—leave space for edges and to prevent spillover.
- Use pre‑cooked or leftover chicken to save time.
- For crisp crust bottoms, bake in a preheated oven and avoid opening early.
- Let muffins rest for a minute after baking so they firm up and are easier to remove.
Kitchen Tools You’ll Need
- Muffin tin (12‑cup is standard; you’ll use 8‑12 cups).
- Mixing bowl for filling.
- Spoon or scoop for portioning into muffin cups.
- Pastry brush (if using puff pastry and egg wash).
- Oven and cooling rack.
Ingredients in Chicken Pot Pie Muffins
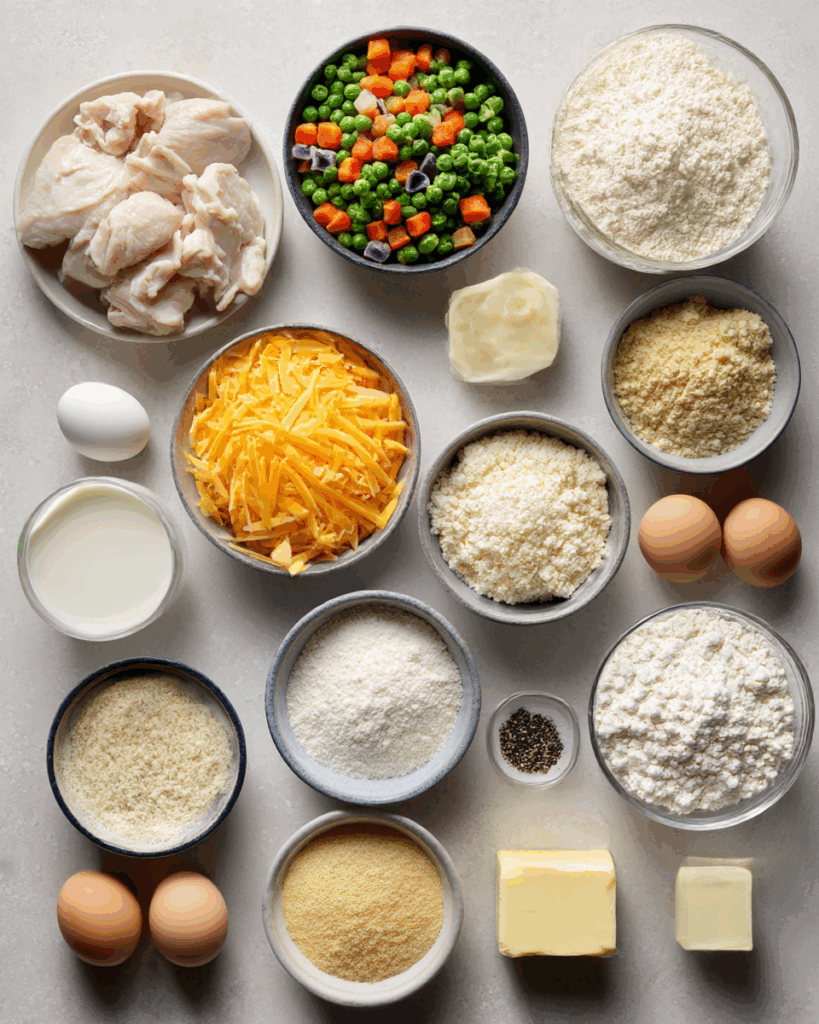
- 2 cups cooked chicken, diced (or shredded) – for hearty protein.
- 1 cup frozen mixed vegetables (peas, carrots, corn, green beans) – classic pot‑pie veggies.
- 1 (10‑11 oz) can condensed cream of chicken soup (or make homemade gravy).
- ¼ cup shredded cheddar cheese – adds extra flavour and melt.
- 1 package (8‑count) refrigerated biscuit dough OR 1 sheet puff pastry – forms the crust.
- Optional seasonings: ½ teaspoon poultry seasoning or thyme, salt & pepper to taste.
- (If pastry base) 1 egg + 1 tablespoon water for egg wash.
Ingredient Substitutions
- Chicken → use turkey, pork, or vegetarian protein.
- Frozen veggies → swap with fresh chopped veggies (just cook a bit longer).
- Condensed soup → homemade cream sauce (butter + flour + milk/chicken broth).
- Biscuit dough → use puff pastry, pie crust, or even tortilla cups.
- Cheese → swap cheddar for mozzarella, gouda or omit for lighter version.
Ingredient Spotlight
Condensed Cream of Chicken Soup: A shortcut that gives rich sauce with minimal fuss. Many mini‑pot‑pie recipes use it for ease. :contentReference[oaicite:1]{index=1}
Refrigerated Biscuit Dough: Makes the crust simple—just press into muffin cups and fill! :contentReference[oaicite:2]{index=2}
Instructions for Making Chicken Pot Pie Muffins
-
Preheat Your Equipment:
Preheat oven to 375 °F (190 °C). Grease 8–12 muffin cups with cooking spray. -
Combine Ingredients:
In a bowl, mix the cooked chicken, thawed frozen vegetables, cream of chicken soup, cheese, and seasonings. -
Prepare Your Cooking Vessel:
If using biscuit dough: Flatten each biscuit into a round and press into a muffin cup, forming crust walls and base.
If using puff pastry: Cut into squares and press into muffin cups, leaving overhang; if using egg wash, whisk egg + water. -
Assemble the Dish:
Spoon the chicken‑vegetable filling into each crust cup (fill to about ⅔ or ¾ full). If using puff pastry, fold corners over slightly and brush with egg wash. -
Cook to Perfection:
Bake for about 15–20 minutes (check biscuit dough or pastry instructions) until crust is golden and filling is bubbly. -
Finishing Touches:
Let muffins rest 2‑3 minutes in pan, then remove carefully and cool slightly on rack. -
Serve and Enjoy:
Serve warm—optionally with a side salad or roasted veggies.
Texture & Flavor Secrets
You’ll get a crisp golden crust around a creamy, savoury filling. The vegetables add sweetness and bite, while the chicken provides substance. The cheddar cheese adds richness. The biscuit or pastry crust contrasts nicely with the smooth interior.
Cooking Tips & Tricks
- If your biscuits are puffing too high, gently puncture the top to release steam.
- For even browning, rotate the muffin tin halfway through baking.
- Leftovers? Cool completely and store in airtight container. Re‑heat in oven for best crust texture.
What to Avoid
- Don’t overfill the cups or the filling will overflow.
- Avoid baking dough that’s too warm—keep biscuit or pastry chilled until placing into muffin cups.
- Don’t skip draining vegetables if they’re frozen—they’ll release moisture and make filling watery.
Nutrition Facts (approximate)
Servings: 8 muffins
Calories per muffin: ~320 (varies based on dough and chicken type)
Preparation Time
Prep Time: 10–15 minutes
Cook Time: 15–20 minutes
Total Time: ~25–35 minutes
Make‑Ahead and Storage Tips
These muffins are great for prepping ahead. Prepare filling in advance and refrigerate. Press dough into tins just before baking. Store cooked muffins in an airtight container in the fridge up to 3 days. Reheat in the oven at 350 °F for about 8‑10 minutes. They can also be frozen (cool completely, wrap individually, freeze up to 2 months); reheat straight from frozen, adding a few minutes to bake time.
How to Serve Chicken Pot Pie Muffins
Serve as the main course with a simple green salad or steamed green beans. They also make great lunch‑box items or party appetizers. Provide a little ramekin of gravy or sauce on the side if you like.
Creative Leftover Transformations
- Slice a muffin in half and sandwich with lettuce for a chicken‑pot‑pie slider.
- Crumble one over cooked rice or mashed potatoes for a ‘pot‑pie casserole.’
- Chop and stir into scrambled eggs for a savoury breakfast twist.
Additional Tips
- Use different veggies like mushrooms, broccoli, or spinach for variation.
- For extra flavour, stir in a teaspoon of garlic powder or smoked paprika.
- Want lighter crust? Use puff pastry rounds and simply cover the top without a full bottom crust.
Variations to Try
- Cheesy Bacon Version: Add cooked bacon bits and swap cheddar for smoked gouda.
- Vegetarian Version: Omit chicken and use white beans or extra veggies with mushroom gravy.
- Spicy Kick: Add diced jalapeños or a pinch of cayenne pepper to the filling.
- Pie Crust Version: Use classic pie dough cut into muffin cups with top crusts and egg wash.
FAQ’s
Q1: Can I use rotisserie chicken?
Yes—shredded rotisserie chicken works perfectly and saves time.
Q2: Can I make these with gluten‑free dough?
Absolutely—use gluten‑free biscuit dough or pastry crust.
Q3: How do I prevent the crust from getting soggy?
Pre‑bake crust cups for 2–3 minutes before filling, or ensure filling is thick and not runny.
Q4: Can I use fresh veggies instead of frozen?
Yes—just sauté or steam them first so they’re tender before mixing with chicken.
Q5: Are these freezer‑friendly?
Yes—cool them completely, wrap individually, freeze up to 2 months; reheat in oven.
Conclusion
Chicken Pot Pie Muffins take all the delicious comfort of a classic pot pie and reform it into bite‑sized, fun, and easy packages. Whether you’re feeding kids, prepping meals ahead, or hosting a party, these muffins check all the boxes. Give them a try—and I promise they’ll become a new favourite.
Print
Chicken Pot Pie Muffins
Description
Soft, chewy peanut butter cookies filled with sweet strawberry jam in the center. A nostalgic treat that’s quick to make, naturally gluten-free, and full of rich, nutty flavor with a fruity finish.
Ingredients
- 1 cup creamy peanut butter
- ½ cup brown sugar
- ¼ cup granulated sugar
- 1 large egg
- 1 teaspoon vanilla extract
- ½ teaspoon baking soda
- ¼ teaspoon salt
- ⅓ cup strawberry jam or jelly
- Flaky sea salt for garnish (optional)
Instructions
- Preheat oven to 350°F. Line a baking sheet with parchment paper.
- In a bowl, stir together peanut butter, both sugars, egg, vanilla, baking soda, and salt until fully combined.
- Scoop dough into 1-inch balls and place on prepared baking sheet.
- Press a thumbprint into the center of each ball and fill with a small amount of jam.
- Sprinkle with flaky sea salt if desired.
- Bake for 9–11 minutes, until edges are golden and centers are set.
- Cool on pan for 5 minutes, then transfer to a wire rack.
Notes
- Use smooth, shelf-stable peanut butter for best results.
- Let cookies cool completely before stacking or storing.
- Add jam after baking if you want a brighter, glossier look.
- Try other jams like raspberry, apricot, or fig for variety.