
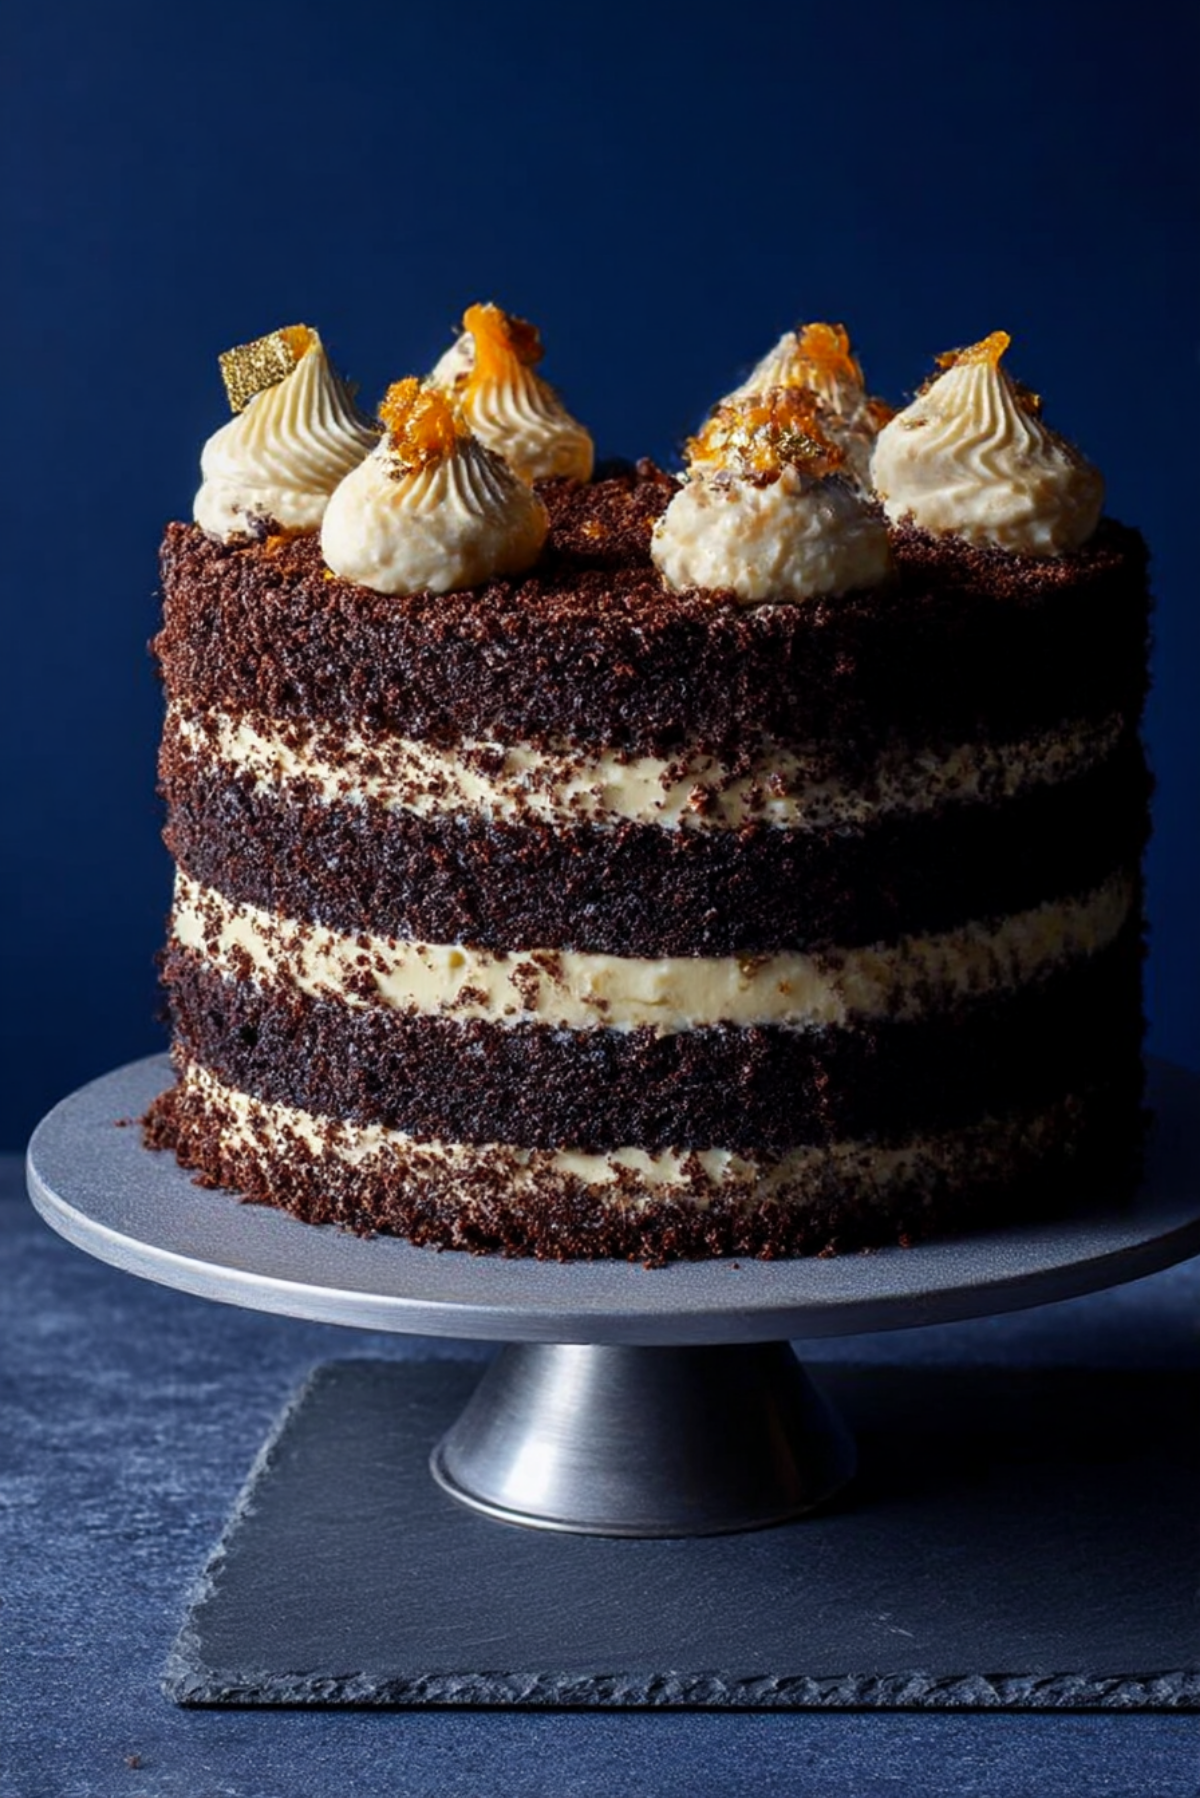
Rich, moist, and unapologetically indulgent, this Chocolate Orange Blackout Cake is a showstopper in every sense of the word. Layers of dark chocolate sponge are infused with citrusy orange zest and smothered in silky orange-scented frosting. Topped with golden candied peel and coated in a blackout crumb shell, this cake isn’t just dessert—it’s drama on a plate.
Behind the Recipe
This cake was born out of a chilly winter weekend when I wanted to bake something that felt like wrapping yourself in a warm blanket. I remembered a blackout cake I had years ago in a tiny Brooklyn bakery and thought, “Why not recreate that decadence but with a festive orange twist?” A few trials later, this beauty came to life—moist chocolate layers, a creamy citrus punch, and a texture so soft it practically melts as soon as you taste it.
Recipe Origin or Trivia
The original blackout cake was made famous in the 1940s by Ebinger’s Bakery in Brooklyn. It got its name from the wartime blackouts, with its ultra-dark, chocolate-crumb-coated exterior. While the classic version focuses solely on chocolate, this version adds a vibrant citrus twist, paying homage to chocolate-orange desserts often enjoyed during the holidays in Europe, especially in the UK.
Why You’ll Love Chocolate Orange Blackout Cake
Every forkful is an irresistible combination of rich cocoa and fresh citrus. Here’s why you’re going to be hooked:
Versatile: Works for birthdays, holidays, or any moment you want to impress.
Budget-Friendly: Uses pantry staples plus a few simple indulgences.
Quick and Easy: For such a dramatic cake, the process is surprisingly straightforward.
Customizable: You can tweak the zest, fillings, and toppings to suit your style.
Crowd-Pleasing: The perfect balance of richness and freshness wins every time.
Make-Ahead Friendly: Bake and frost a day ahead for an even deeper flavor.
Great for Leftovers: Stays moist for days—if it even lasts that long!
Chef’s Pro Tips for Perfect Results
Baking a cake like this can feel intimidating, but trust me, you’ve got this. Here are a few tips that will set you up for success:
- Use room temperature ingredients to help everything blend smoothly.
- Don’t overmix the batter, or you’ll lose that fluffy, tender crumb.
- Zest your oranges before juicing—it’s easier and gives you maximum flavor.
- Chill the cake before applying the final crumb coat for a cleaner finish.
- For extra intensity, brush each layer with a little orange syrup before frosting.
Kitchen Tools You’ll Need
Gather your tools before you start for a stress-free baking experience:
Mixing Bowls: You’ll need a few for wet and dry ingredients.
Electric Mixer or Whisk: Essential for whipping the frosting until fluffy.
Cake Tins: Three 8-inch round tins give you those classic tall layers.
Cooling Rack: Helps the cakes cool evenly before frosting.
Zester or Microplane: To get that fragrant orange zest just right.
Offset Spatula: Makes frosting and layering a breeze.
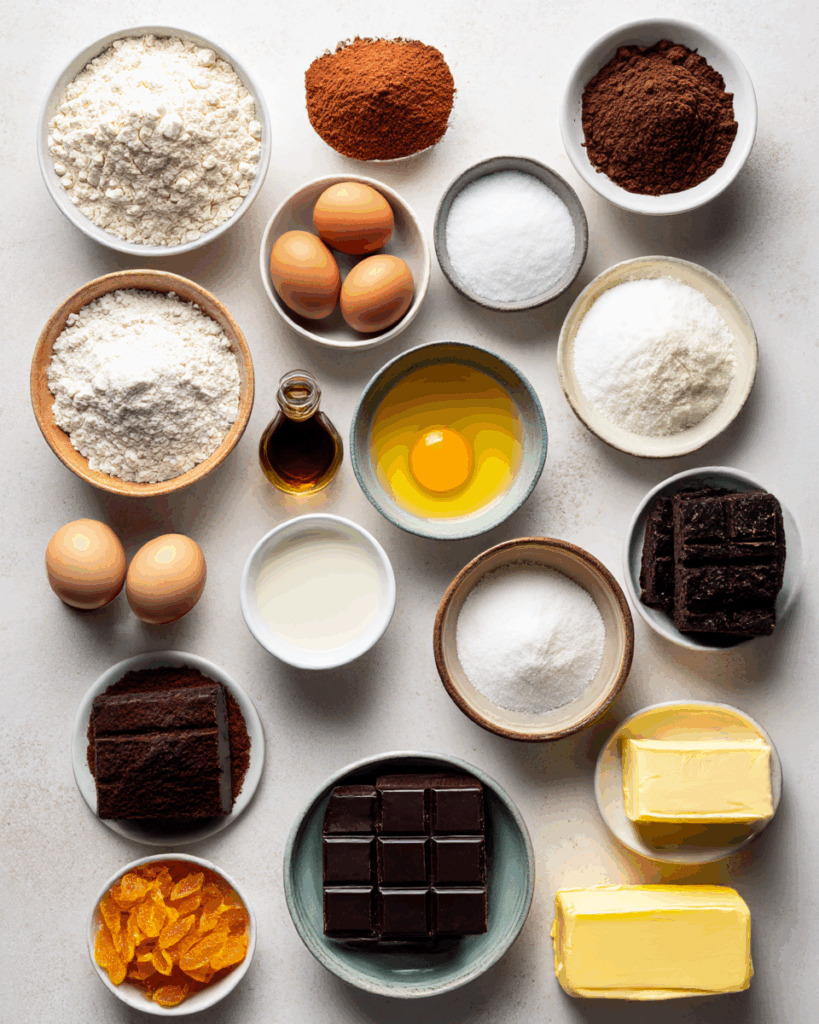
Ingredients in Chocolate Orange Blackout Cake
Each ingredient plays its part in building this chocolatey masterpiece. Here’s what you’ll need:
- Plain Flour: 250 grams. Forms the structure of the sponge.
- Cocoa Powder: 75 grams. Provides the intense chocolate flavor.
- Baking Soda: 1½ teaspoons. Helps the cake rise and stay fluffy.
- Caster Sugar: 300 grams. Sweetens and adds moisture.
- Eggs: 3 large. Bind the batter and contribute richness.
- Buttermilk: 240 ml. Adds tang and tenderizes the crumb.
- Vegetable Oil: 120 ml. Keeps the cake incredibly moist.
- Orange Zest: From 2 oranges. Infuses the sponge with fresh citrus aroma.
- Vanilla Extract: 1 teaspoon. Enhances all the other flavors.
- Dark Chocolate: 150 grams, melted. Deepens the chocolate flavor.
- Unsalted Butter: 200 grams, softened. Used in the frosting.
- Icing Sugar: 300 grams. Sweetens and gives body to the frosting.
- Candied Orange Peel: For garnish. Adds texture and sparkle.
Ingredient Substitutions
Need to make a swap or two? Here’s how you can make it work:
Buttermilk: Mix regular milk with 1 tablespoon lemon juice or vinegar.
Vegetable Oil: Use sunflower oil or melted coconut oil.
Dark Chocolate: Semi-sweet chocolate works fine in a pinch.
Orange Zest: Replace with clementine or tangerine zest.
Icing Sugar: Blend granulated sugar to make a DIY powdered version.
Ingredient Spotlight
Cocoa Powder: Choose a good-quality unsweetened cocoa powder for the deepest chocolate flavor. It’s what gives the sponge that signature blackout richness.
Orange Zest: This adds a fresh, fragrant dimension that cuts through the richness of the chocolate, bringing balance and brightness to each bite.
Instructions for Making Chocolate Orange Blackout Cake
Let’s dive in and bake this beauty step-by-step. Here’s what you’ll do:
-
Preheat Your Equipment:
Preheat your oven to 180°C (350°F). Grease and line three 8-inch cake tins. -
Combine Ingredients:
In a large bowl, sift together flour, cocoa powder, and baking soda. In another bowl, whisk eggs, sugar, buttermilk, oil, orange zest, and vanilla. Mix the wet into the dry, then fold in melted dark chocolate until smooth. -
Prepare Your Cooking Vessel:
Divide the batter evenly between the prepared tins. Tap lightly to release air bubbles. -
Assemble the Dish:
Bake for 22–25 minutes or until a toothpick inserted comes out clean. Cool in tins for 10 minutes, then transfer to a wire rack to cool completely. -
Cook to Perfection:
While cakes cool, prepare the frosting by beating butter until light and fluffy. Slowly add icing sugar and a touch of orange zest, whipping until creamy and spreadable. -
Finishing Touches:
Layer the cakes with frosting between each tier. Cover the outside with a thin crumb coat, chill, then finish with a thicker layer of frosting and press cake crumbs onto the sides. -
Serve and Enjoy:
Top with candied orange peel and serve slices slightly chilled or at room temperature.
Texture & Flavor Secrets
This cake is all about contrast. The sponge is ultra-soft and moist with a rich chocolate base and bursts of fresh orange throughout. The frosting is creamy but light, and the crumb coating adds just a whisper of crunch. Together, they create a dessert that’s decadent without being overly heavy.
Cooking Tips & Tricks
Make the experience even sweeter with these tips:
- Bake the layers a day ahead to make assembly easier.
- Use parchment paper rounds in the tins to prevent sticking.
- Chill your frosting briefly if it gets too soft while assembling.
What to Avoid
Keep your cake from going off track with these common pitfalls:
- Don’t skip the crumb coat—it keeps the final layer smooth and clean.
- Avoid overbaking, which can dry out the sponge.
- Don’t zest too deeply—the white pith is bitter.
Nutrition Facts
Servings: 10
Calories per serving: Approximately 480
Note: These are approximate values.
Preparation Time
Prep Time: 30 minutes
Cook Time: 25 minutes
Total Time: 55 minutes
Make-Ahead and Storage Tips
This cake is even better the next day. You can bake the layers and prepare the frosting 24 hours in advance. Assemble the cake and store in the fridge, covered, for up to 3 days. Bring to room temperature before serving. It freezes well (frosted or unfrosted) for up to a month.
How to Serve Chocolate Orange Blackout Cake
For maximum impact, serve slices with a twist of orange peel or a dusting of cocoa powder. Pair with a rich espresso, a scoop of vanilla ice cream, or even a drizzle of warm chocolate sauce.
Creative Leftover Transformations
Not likely, but if you have leftovers:
- Cake truffles: Mix with frosting, roll, and coat in chocolate.
- Chocolate-orange trifles: Layer with cream and fruit in glasses.
- Toasted slices: Gently reheat in the oven for a crispy edge.
Additional Tips
- Want an even deeper chocolate flavor? Add a teaspoon of espresso powder to the batter.
- For a glossy top, warm a bit of dark chocolate and drizzle before serving.
- Use gold leaf or edible glitter for a festive finish.
Make It a Showstopper
Presentation is everything. Use a white cake stand to make the dark cake pop. Garnish with candied orange slices, curls of zest, and edible gold for a luxe touch. Slice cleanly with a hot knife for bakery-worthy cuts.
Variations to Try
- Double Chocolate: Add chocolate chips to the batter for melty pockets.
- Nutty Twist: Fold chopped hazelnuts or almonds into the filling.
- Boozy Touch: Soak layers lightly in orange liqueur (optional for adults).
- Spiced Orange: Add a pinch of cinnamon and cardamom to the batter.
- Mini Cakes: Bake in ramekins for individual servings.
FAQ’s
Q1: Can I make this cake gluten-free?
A1: Yes, just use a 1:1 gluten-free flour blend in place of regular flour.
Q2: Can I use store-bought frosting?
A2: You can, but homemade orange buttercream makes a huge difference in flavor.
Q3: How do I store leftovers?
A3: Keep them in an airtight container in the fridge for up to 3 days.
Q4: What’s the best type of cocoa powder?
A4: Dutch-processed cocoa gives the deepest flavor and darkest color.
Q5: Can I skip the crumb coating?
A5: Technically yes, but it gives the cake its signature blackout finish.
Q6: How long can I freeze the cake?
A6: Up to 1 month if well wrapped and sealed.
Q7: Can I use milk chocolate instead of dark?
A7: You can, but it will make the cake sweeter and less rich.
Q8: How do I make the frosting more orange-flavored?
A8: Add a tablespoon of fresh orange juice and more zest to the buttercream.
Q9: What size cake tins should I use?
A9: Three 8-inch round tins work best for tall, even layers.
Q10: Can I bake this in one deep tin?
A10: It’s better to divide into layers to ensure even baking and texture.
Conclusion
This Chocolate Orange Blackout Cake is a total game-changer. It’s bold, beautiful, and bursting with flavor. Whether you’re baking it for a celebration or just to treat yourself, every slice is a reminder that chocolate and orange are a match made in dessert heaven.
Print
Chocolate Orange Blackout Cake
Description
A rich and indulgent Chocolate Orange Blackout Cake featuring layers of dark chocolate sponge infused with orange zest, frosted with a creamy orange-scented buttercream, and coated in a dramatic blackout crumb finish. Perfect for holidays, birthdays, or whenever you want to impress.
Ingredients
- 250 grams plain flour
- 75 grams cocoa powder
- 1½ teaspoons baking soda
- 300 grams caster sugar
- 3 large eggs
- 240 ml buttermilk
- 120 ml vegetable oil
- Zest from 2 oranges
- 1 teaspoon vanilla extract
- 150 grams dark chocolate, melted
- 200 grams unsalted butter, softened
- 300 grams icing sugar
- Candied orange peel, for garnish
Instructions
- Preheat oven to 180°C (350°F). Grease and line three 8-inch cake tins.
- Sift together flour, cocoa powder, and baking soda in a bowl. In another bowl, whisk eggs, sugar, buttermilk, oil, orange zest, and vanilla extract.
- Combine wet and dry ingredients, then fold in melted dark chocolate until smooth.
- Divide batter evenly between tins and bake for 22–25 minutes, or until a toothpick comes out clean. Let cool in tins for 10 minutes, then transfer to a wire rack.
- To make the frosting, beat butter until fluffy, then gradually add icing sugar and additional orange zest until light and creamy.
- Layer the cooled cakes with frosting between each tier. Apply a thin crumb coat and chill, then finish with a thicker layer of frosting and press cake crumbs on the sides.
- Top with candied orange peel and serve slightly chilled or at room temperature.
Notes
- Use room temperature ingredients for best results.
- For more orange flavor, add a tablespoon of orange juice to the frosting.
- Brush cake layers with orange syrup for extra moisture and flavor.