

When I first made these bars, it felt like I’d captured that beloved “cereal‑milk” nostalgia in bar‑form—bright, chewy, colorful and ridiculously fun. The moment I pressed the hot mixture into the pan and let it set, the promise of gooey marshmallow covered cereal bits made me grin. And once I took that first bite and heard the slight crunch of cereal and the sweet melt of marshmallow—well, I knew this was going into my dessert rotation.
Behind the Recipe
And now let’s dive into how this recipe came about. I was craving a nostalgic treat—something that reminded me of childhood breakfasts and sugar‑filled fun, but in a shareable, bar form. Inspired by classic rice cereal treats, I swapped in Fruity Pebbles cereal to crank up both color and fruit‑flavor punch. With minimal ingredients and almost no baking, it became a go‑to when I needed something quick yet playful.
Recipe Origin or Trivia
Fruity Pebbles cereal itself has a long history—it was introduced in 1971 by Post Consumer Brands under the licensing of the Flintstones characters. Wikipedia+2confessionsofagroceryaddict.com+2 The trend of turning cereal into marshmallow‑bound bars (like Rice Krispies Treats) is a longstanding snack tradition, and this version just gives it a vivid, fruit‑cereal twist.
Why You’ll Love These Bars
Here’s what makes them special and why you’ll want to keep this recipe:
- Vibrant and fun: The rainbow cereal bits bring so much visual appeal—perfect for parties or lunchboxes.
- Quick & simple: With just a few ingredients and one pan, you’re close to a treat in no time. confessionsofagroceryaddict.com+1
- Nostalgic flavor: That familiar fruity cereal taste, combined with melted marshmallow, is deeply comforting.
- Customisable: Keep them plain or add drizzles, crushed toppings, even seasonal cereal variations.
- Crowd‑pleasing: Kids to adults love the crunch‑chewy contrast and bright colors.
Chef’s Pro Tips for Perfect Results
- Use fresh marshmallows (mini size works best) so the binding is smooth and has good stretch. The Short Order Cook+1
- Grease or line your pan well (e.g., with parchment) so you can press and remove bars easily without sticking.
- Press the mixture into the pan before it fully sets—this helps the bars hold together firmly.
- Let the bars sit to set (some recipes say ~1 hour) before cutting to get clean edges. The Country Cook
- If you like, add a drizzle of white chocolate or colored icing on top for extra flair.
Kitchen Tools You’ll Need
- A large pot or saucepan to melt butter & marshmallows
- 9×13‑inch (or 8×8 for thicker bars) baking dish, lined or greased
- Spatula for stirring the mixture
- Measuring cups/spoons
- Knife for cutting bars
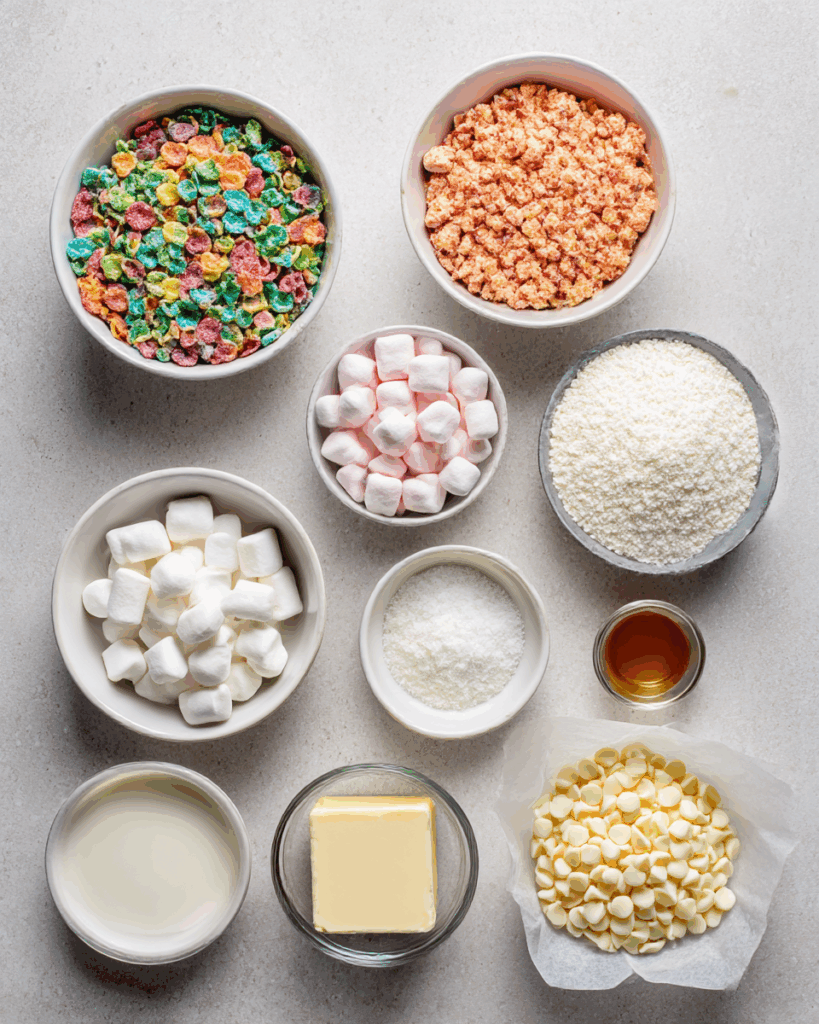
Ingredients in Fruity Pebbles Milk ’n’ Cereal Bars
Here’s a typical ingredient list (approximate quantities):
- 4 tablespoons butter (salted, for flavour) The Country Cook+1
- 10 ounces mini marshmallows (plus optional extra marshmallows for texture) The Country Cook+1
- 6 cups (or more) Fruity Pebbles cereal The Country Cook
- Optional: ½ cup extra mini marshmallows mixed in for extra chew The Country Cook
- Optional toppings: white chocolate drizzle, freeze‑dried strawberries, sprinkles confessionsofagroceryaddict.com
Ingredient Substitutions
- Use vegan butter and vegan marshmallows to make a dairy/egg‑free version. confessionsofagroceryaddict.com
- Swap the cereal for another crisp rice cereal or a themed version like Cocoa Pebbles for a chocolate variant. The Country Cook
- For thicker bars, use an 8×8‑inch pan rather than 9×13. The Country Cook
Ingredient Spotlight
- Fruity Pebbles cereal: The crunchy base full of bright fruit flavour and vivid colours—making the bars visually and flavour‑wise appealing.
- Marshmallows + butter: This combination creates the gooey binder that holds the cereal together and gives that fond childhood treat texture.
Instructions for Making the Bars
- Prepare the pan: Grease or line a 9×13‑inch baking dish with parchment.
- Melt butter & marshmallows: In a large pot, melt butter over medium heat, then add mini marshmallows. Stir until mostly melted and smooth.
- Add cereal: Remove from heat and quickly fold in the Fruity Pebbles cereal until evenly coated.
- (Optional) Add extra marshmallows: For extra chew, fold in ½ cup mini marshmallows. The Country Cook
- Press into pan: Transfer the mixture into the prepared dish. With a lightly buttered spatula or greased hands, press the mixture evenly but firmly into the dish.
- Let set: Allow to cool and set—about 10‑20 minutes for thinner bars or up to an hour if you used a smaller pan. The Country Cook
- Cut & serve: Once set, cut into squares or rectangles. If desired, drizzle with melted white chocolate or other toppings. confessionsofagroceryaddict.com
Texture & Flavor Secrets
The magic lies in the contrast: the crisp crunch of the cereal, the soft chew of marshmallow, and the melting butter that gives richness. The fruit‑cereal flavour offers bright sweetness without heaviness, and when chilled just right, the bars hold together yet still have a tender bite.
Cooking Tips & Tricks
- If bars start to get too firm too quickly when spreading, lightly mist your hands or spatula with non‑stick spray so they don’t stick.
- Don’t over‑heat the marshmallows—once they’re melted and smooth, remove from heat to avoid browning or toughening.
- Store bars in an airtight container at room temperature; if they become slightly stale, microwave for ~8 seconds to soften. The Country Cook
What to Avoid
- Pressing the mixture too hard can make the bars overly dense and hard to bite.
- Trying to cut while fully un‑set may cause crumbling—wait until the bars are firm.
- Using oversized marshmallows instead of mini can result in uneven melting and lumps. The Short Order Cook
Nutrition Facts
Approximate per bar (depending on size and ingredients) – example from variant: ~250 calories per serving for typical version. The Country Cook
Preparation Time & Storage
Prep time: ~5–10 minutes
Cook time: ~5–10 minutes
Cooling/Setting time: ~10–60 minutes depending on thickness
Total time: ~20‑30 minutes minimum
Storage: Store in an airtight container at room temperature up to ~2‑3 days. For best texture, consume sooner.
How to Serve
Serve the bars on a dessert tray, in lunchboxes, or as a fun snack after school. You can dress them up for parties by adding drizzle of melted white chocolate, sprinkles or even colourful toppings. They pair well with a glass of milk (duh) and are a fun treat for kids and adults alike.
Creative Leftover Transformations
- Break the bars into bite‑sized pieces and use as topping for ice cream, yogurt or pudding.
- Crumble into a bowl and mix with marshmallows and nuts for a treat‑mix snack.
- Freeze small bar squares for quick grab‑and‑go snacks, then thaw briefly before eating.
Additional Tips
- Looking to make them extra festive? Add rainbow sprinkles or edible glitter on the top before the drizzle sets.
- For a slightly healthier twist, use half the butter or a reduced‑sugar cereal variant and press into a smaller pan for thicker bars.
- Want extra flavor? Melt a little white chocolate with fruit extract and drizzle over for a “fancy” look. confessionsofagroceryaddict.com
Variations to Try
- Cocoa Pebbles version: Use Cocoa Pebbles instead of Fruity Pebbles for a chocolate‑crisp marshmallow bar. The Country Cook
- Vegan version: Use vegan butter and marshmallows; ensure cereal is vegan‑friendly. confessionsofagroceryaddict.com
- No‑bake layered bars: Press base as above, then top with a layer of melted white chocolate and freeze‑dried fruit before cutting.
- Crunchy‑added version: Add chopped nuts (pecans, almonds) or shredded coconut for extra texture.
FAQ’s
Q1: Are these bars gluten‑free?
A: Since Fruity Pebbles cereal is gluten‑free, and the recipe uses just cereal, butter and marshmallows, yes—they can be gluten‑free if your marshmallows are gluten‑free. confessionsofagroceryaddict.com+1
Q2: Can I use large marshmallows instead of mini?
A: You can, but you’ll need to melt them a bit longer and they may not distribute as evenly. Mini marshmallows give a smoother texture. The Short Order Cook
Q3: How thick should I make the bars?
A: Using a 9×13‑inch pan gives thinner bars; using an 8×8‑inch pan gives thicker squares. The Country Cook
Q4: Will they stick together too much?
A: If they seem too sticky, press them lightly with a buttered spatula and let them cool fully. Parchment helps with removal.
Q5: Can I add other mix‑ins?
A: Yes—chocolate chips, freeze‑dried fruit, sprinkles are all fun additions. Limit the extras to ~½ cup so the bars hold together. confessionsofagroceryaddict.com
Conclusion
These Fruity Pebbles Milk ’n’ Cereal Bars bring together childhood cereal nostalgia and gooey marshmallow fun into a bright, easy‑to‑make treat. They’re fast, colourful, shareable and customisable—whether you’re making snacktime special, packing lunches, or hosting a party. Once you take that first bite—crisp‑chewy cereal, sweet marshmallow binding—you’ll want to keep a batch on hand. Happy pressing, cutting, and indulging!
Print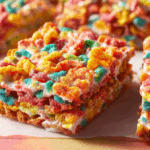
Fruity Pebbles Milk ’n’ Cereal Bars
Description
Fruity Pebbles Milk ’n’ Cereal Bars are vibrant, chewy, and loaded with sweet, fruity flavor. Made with just 3 ingredients, these no-bake cereal bars are perfect for lunchboxes, parties, or a quick nostalgic snack. Colorful, fun, and incredibly easy to make!
Ingredients
- 6 cups Fruity Pebbles cereal
- 10 oz mini marshmallows
- 4 tbsp unsalted butter
- Optional: ½ cup extra mini marshmallows for added texture
- Optional toppings: melted white chocolate, sprinkles
Instructions
- Grease or line a 9×13-inch baking pan with parchment paper.
- In a large pot, melt butter over medium heat. Add mini marshmallows and stir until fully melted and smooth.
- Remove from heat and quickly fold in Fruity Pebbles cereal until evenly coated. Stir in extra mini marshmallows if using.
- Press the mixture firmly into the prepared pan using a greased spatula or buttered hands.
- Let set for 30–60 minutes at room temperature. Once firm, cut into bars and enjoy.
Notes
- Use fresh mini marshmallows for the best texture.
- Press gently—don’t compact too hard or bars may get tough.
- Store in an airtight container at room temp for up to 3 days.