Introduction
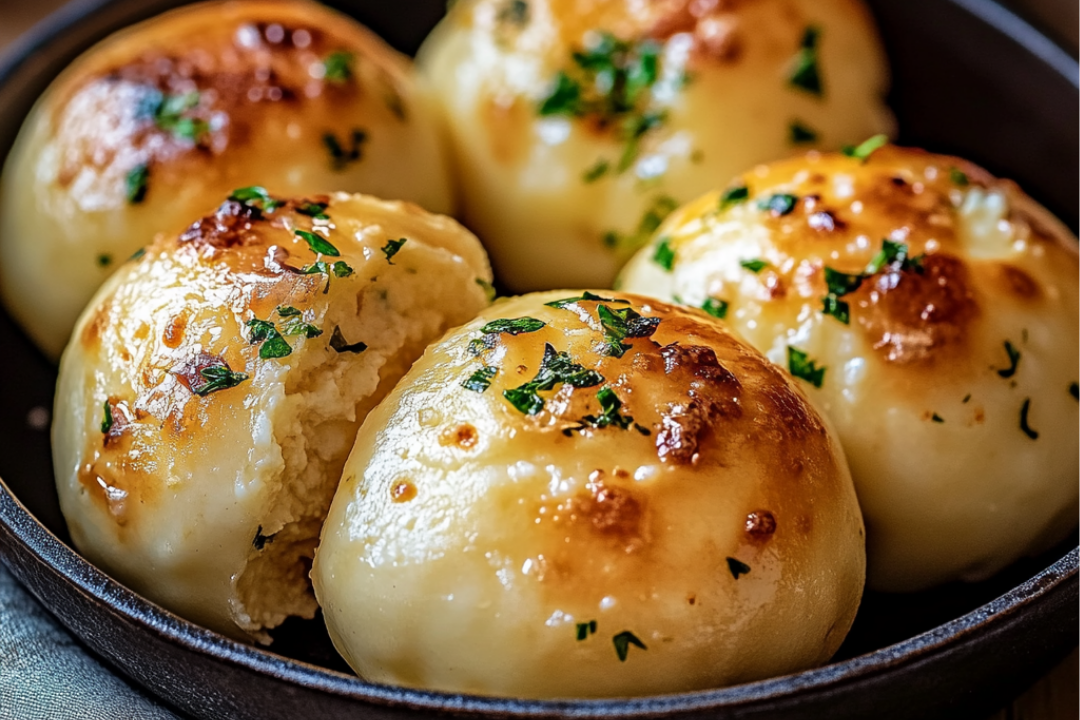
I recently tried making Garlic Butter Cheese Bombs for a family gathering, and let me tell you, they were an instant hit! These little cheesy delights are the perfect combination of gooey mozzarella, soft biscuit dough, and a savory garlic butter topping. From the moment they came out of the oven, my family couldn’t resist the golden-brown, fragrant aroma that filled the house. Not only are they a great snack, but they also make a perfect appetizer for any party or casual dinner. The best part? They’re so easy to make that even a beginner in the kitchen can master them in no time!
If you’re looking for a crowd-pleaser that’s quick, delicious, and full of flavor, Garlic Butter Cheese Bombs are the perfect recipe to add to your collection. You only need a few simple ingredients, and the results are nothing short of amazing. These cheese bombs have a crispy, buttery exterior and a soft, cheesy interior that’s hard to resist.
Why You’ll Love These Garlic Butter Cheese Bombs
The Garlic Butter Cheese Bombs are a must-try for anyone who loves cheese and garlic, and who doesn’t? They’re a guaranteed crowd-pleaser at parties, family gatherings, and casual dinners. The mozzarella cheese inside each biscuit provides that gooey, melty goodness, while the buttery, garlic-flavored topping takes it to the next level.
These little bombs are perfectly sized for snacking, and they pair wonderfully with marinara sauce for dipping. They’re also versatile enough to be served alongside a main course or as an appetizer before dinner. The combination of the soft, flaky biscuit dough with the gooey cheese and the rich garlic butter will make your taste buds do a happy dance!
Ingredients
To make these Garlic Butter Cheese Bombs, you’ll need the following ingredients:
- 1 can Pillsbury biscuits (8-count)
- 8 mozzarella cheese sticks, cut in half
- 4 tablespoons butter, melted
- 1 teaspoon garlic powder
- 1 teaspoon dried Italian seasoning
- Marinara sauce (for dipping)
These ingredients are simple and easy to find at any grocery store. Most of the items are pantry staples that you may already have on hand, making this recipe a convenient option when you’re craving a cheesy snack.
Instructions
Preheat the Oven:
Set your oven to 375°F (190°C). Preheating the oven ensures that your biscuits bake evenly and turn golden brown on the outside while staying soft and cheesy on the inside.
Prepare the Biscuits:
Open the can of Pillsbury biscuits and separate each biscuit from the others. You’ll want to flatten each biscuit into a round disc, either by gently pressing them with your hands or using a rolling pin. Make sure each disc is wide enough to wrap around the mozzarella stick.
Add the Cheese:
Take half of a mozzarella cheese stick and place it in the center of each flattened biscuit. The mozzarella should fit perfectly inside the biscuit, but make sure to leave enough space around the edges to seal the dough.
Seal the Dough:
Carefully fold the edges of the biscuit dough over the cheese stick. Pinch the seams tightly to seal the dough, ensuring there are no gaps where the cheese could leak out while baking. The dough should form a ball shape, fully encasing the cheese.
Arrange on the Baking Sheet:
Line a baking sheet with parchment paper or lightly grease it to prevent the biscuits from sticking. Arrange the sealed cheese bombs on the baking sheet, making sure to leave some space between each one to allow them to expand as they bake.
Prepare the Garlic Butter:
In a small bowl, melt the butter and stir in garlic powder and Italian seasoning. Mix everything together until the ingredients are fully incorporated. This garlic butter mixture is what will give the cheese bombs their rich flavor.
Brush with Garlic Butter:
Use a pastry brush to generously coat the tops of each cheese-filled biscuit with the garlic butter mixture. Be sure to cover every bit of the dough so it becomes golden and flavorful during baking.
Bake:
Place the baking sheet in the preheated oven and bake for 10-12 minutes, or until the cheese bombs turn golden brown and the biscuits puff up. The baking time may vary slightly depending on your oven, so keep an eye on them as they bake.
Serve and Enjoy:
Once the garlic butter cheese bombs are baked to perfection, remove them from the oven and allow them to cool for a couple of minutes. Serve them warm with a side of marinara sauce for dipping. The cheesy, gooey interior paired with the savory garlic butter and the rich marinara sauce makes every bite a delicious experience.
Nutrition Facts
These Garlic Butter Cheese Bombs are an indulgent treat, so they’re best enjoyed in moderation. Here’s a breakdown of the nutrition for one serving (which is about 1-2 cheese bombs):
- Serving Size: 1-2 cheese bombs
- Calories: 220-250 calories
- Sugar: 1g
- Sodium: 380mg
-
Fat: 16g
- Saturated Fat: 8g
- Unsaturated Fat: 6g
- Trans Fat: 0g
-
Carbohydrates: 16g
- Fiber: 0g
- Protein: 7g
- Cholesterol: 40mg
The calorie count may vary based on the size of the biscuits and the specific brands used for ingredients.
Preparation Time
- Prep Time: 10 minutes
- Cook Time: 12 minutes
- Total Time: 22 minutes
This recipe is perfect when you’re short on time but still want to make something delicious and impressive.
How to Serve
- Serve with Marinara Sauce: Garlic Butter Cheese Bombs are best served with a side of warm marinara sauce for dipping.
- As an Appetizer: They make a perfect starter before dinner or during parties.
- Pair with Pasta: These cheese bombs go wonderfully with a pasta dish, making them the perfect side.
- Serve with Veggies: For a lighter option, serve with fresh veggie sticks like carrots, cucumbers, or celery.
Additional Tips
- Use Fresh Mozzarella: For an extra cheesy experience, you can substitute string cheese with fresh mozzarella.
- Add Herbs: You can sprinkle some fresh parsley or basil on top for added color and flavor.
- Keep the Biscuits Sealed: Make sure to pinch the seams tightly when sealing the dough around the cheese to prevent any leakage during baking.
- Make Ahead: Prepare the cheese bombs ahead of time, store them in the fridge, and bake them just before serving.
- Garlic Lovers: If you love garlic, feel free to add an extra teaspoon of garlic powder to the garlic butter mixture for a more intense flavor.
FAQ Section
1. Can I use other types of cheese for this recipe?
Yes! You can substitute mozzarella with cheddar, pepper jack, or any cheese you like.
2. Can I make these cheese bombs without the garlic butter?
While the garlic butter adds a rich, savory flavor, you can skip it and still enjoy a tasty cheese bomb.
3. Can I freeze the garlic butter cheese bombs?
Yes, you can freeze them before baking. Just freeze them on a baking sheet and then transfer them to a ziplock bag. Bake them directly from the freezer when you’re ready.
4. Can I use homemade biscuit dough?
Absolutely! If you prefer, you can make your own biscuit dough from scratch.
5. How can I make these spicier?
Add some chopped jalapeños or red pepper flakes to the garlic butter mixture to spice things up.
6. Can I serve these with other dipping sauces?
These cheese bombs also pair well with ranch dressing, garlic sauce, or even a spicy buffalo sauce.
7. Can I use vegan cheese for this recipe?
Yes, you can use vegan cheese alternatives if you prefer a dairy-free version.
8. How do I reheat leftovers?
To reheat, place the cheese bombs in the oven at 350°F (175°C) for about 5-7 minutes until warm.
9. Can I double the recipe?
Yes, this recipe is easy to scale up if you’re serving a large group.
10. How do I store leftover garlic butter cheese bombs?
Store any leftovers in an airtight container in the fridge for up to 3 days. Reheat in the oven for the best results.
These Garlic Butter Cheese Bombs are a quick, delicious, and crowd-pleasing snack. Whether you’re hosting a party, enjoying a family dinner, or just craving a cheesy treat, these cheesy bites will not disappoint. Give them a try and watch them disappear in no time!
Print
Garlic Butter Cheese Bombs
- Prep Time: 5 minutes
- Cook Time: 10 minutes
- Total Time: 15 minutes
- Yield: 6 servings 1x
- Category: Appetizer
- Method: baking
- Cuisine: American
- Diet: Vegetarian
Description
These Garlic Ritz Snacks are the perfect combination of buttery, garlicky goodness with a crispy crunch. Simple to make and packed with flavor, they make an irresistible snack or appetizer for any occasion. With just a few ingredients, these Ritz crackers are transformed into a delicious treat that’s sure to impress your guests.
Ingredients
- 1 box Ritz crackers
- 1/2 cup butter, melted
- 1 teaspoon garlic powder
- 1/2 teaspoon dried parsley
- 1/4 teaspoon salt
- 1/4 cup grated Parmesan cheese
Instructions
- Preheat your oven to 300°F (150°C).
- In a small bowl, mix together the melted butter, garlic powder, dried parsley, and salt.
- Arrange the Ritz crackers on a baking sheet in a single layer.
- Brush each cracker with the garlic butter mixture, then sprinkle with grated Parmesan cheese.
- Bake in the preheated oven for about 10 minutes, or until the crackers are golden and crispy.
- Remove from the oven and let cool on the baking sheet for 5 minutes before serving.
- Serve and enjoy! These make a perfect snack or appetizer.
Notes
- Be sure to watch the crackers closely while baking to prevent them from burning.
- If you like a stronger garlic flavor, feel free to add a bit more garlic powder.
- These crackers can be stored in an airtight container for up to 3 days
Nutrition
- Serving Size: 1/6 of recipe (approximately 5 crackers
- Calories: 180kcal
- Sugar: 1g
- Sodium: 230mg
- Fat: 14g
- Saturated Fat: 7g
- Unsaturated Fat: 6g
- Trans Fat: 0g
- Carbohydrates: 12g
- Fiber: 1g
- Protein: 2g
- Cholesterol: 25mg

