

There is something deeply comforting about baking bread from scratch, especially when the aroma of garlic and herbs starts to fill the kitchen. It slowly builds into that warm, inviting scent that makes you pause for a second and just enjoy the moment. This focaccia comes out golden, soft, and slightly crisp on the edges, with little pockets that hold olive oil and herbs in the most delicious way. Trust me, you’re going to love this one, it’s simple but feels incredibly special.
A Bread That Feels Like Home
Focaccia has this way of turning any meal into something cozy and complete. It is soft and airy inside, with a lightly crisp surface that carries all the flavor from the garlic and herbs. Whether you serve it warm or at room temperature, it always brings that comforting, homemade feel to the table.
A Taste of Italian Tradition
Focaccia comes from Italy, where it has been baked for centuries as a simple yet flavorful flatbread. Traditionally, it was made with basic ingredients like flour, water, and olive oil, then topped with herbs. Over time, it became a staple in many kitchens, loved for its versatility and rich flavor. This version keeps that tradition alive while adding a little extra garlic goodness.
Why This Recipe Always Delivers
Before we dive into the process, here is why this one stands out.
Versatile: Works as a side, sandwich bread, or snack.
Budget-Friendly: Uses simple pantry staples.
Quick and Easy: Straightforward steps make it approachable even for beginners.
Customizable: You can change herbs or add toppings easily.
Crowd-Pleasing: Soft texture and savory flavor make it a favorite.
Make-Ahead Friendly: Dough can be prepared in advance.
Great for Leftovers: Tastes amazing even the next day.
Tips from the Kitchen for Perfect Focaccia
And now let’s dive into some tips that make a real difference.
- Let the dough rise fully to get that airy texture.
- Use good quality olive oil for the best flavor.
- Do not skip dimpling the dough, it helps hold the oil and herbs.
- Bake until the top is deeply golden for the best texture.
Tools That Make Baking Easier
Having the right tools makes the process smoother.
Mixing Bowl: For combining and resting the dough.
Baking Pan: Gives the focaccia its shape and thickness.
Wooden Spoon: Helps mix the dough easily.
Oven: Essential for achieving that golden crust.
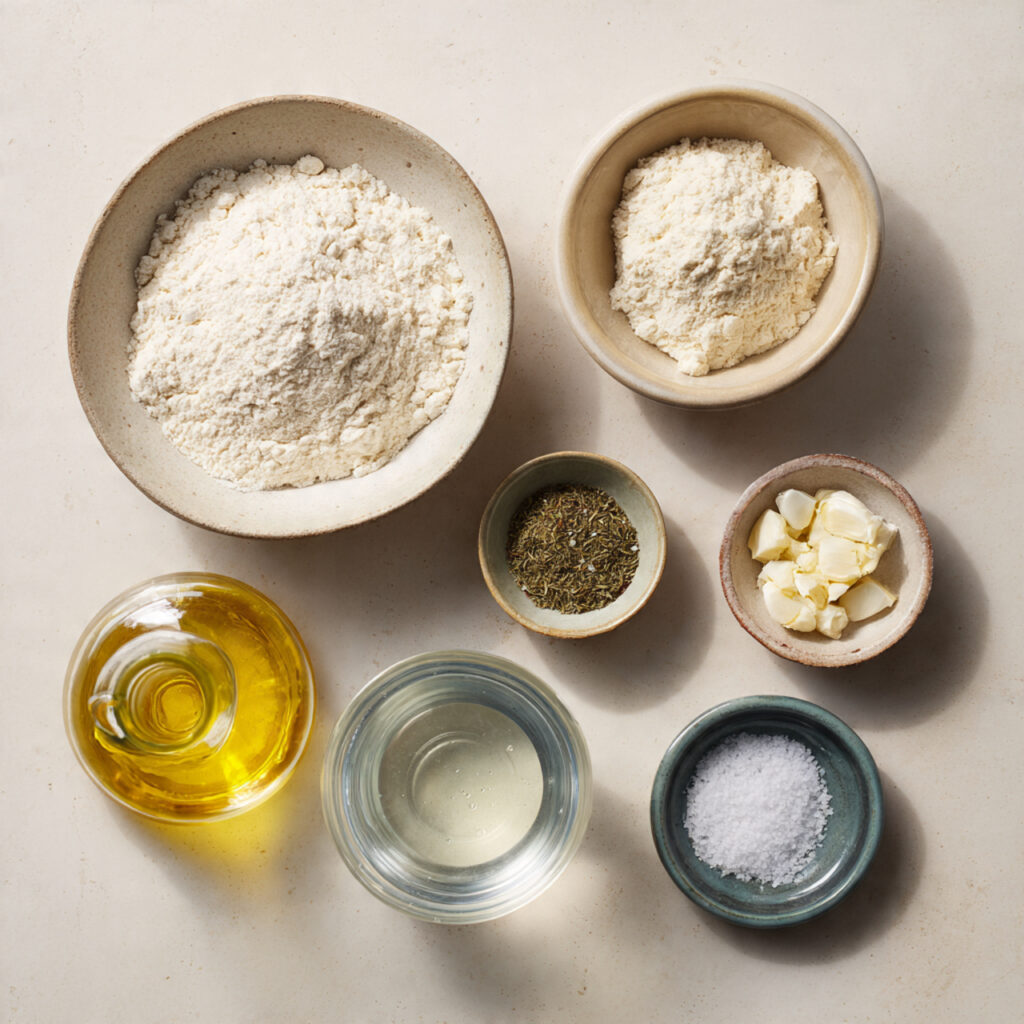
Ingredients That Create the Magic
Let’s take a closer look at what goes into this bread.
- All-Purpose Flour: 3 cups, forms the base of the dough.
- Warm Water: 1 ¼ cups, activates the yeast and hydrates the dough.
- Active Dry Yeast: 2 ¼ teaspoons, helps the dough rise.
- Olive Oil: ¼ cup, adds richness and flavor.
- Garlic: 3 cloves, minced, brings bold aroma.
- Dried Herbs: 1 tablespoon, adds classic flavor.
- Salt: 1 teaspoon, enhances taste.
Easy Ingredient Substitutions
Sometimes you want to tweak things a little.
All-Purpose Flour: Use bread flour for a chewier texture.
Dried Herbs: Swap with fresh herbs if available.
Olive Oil: Use infused oil for extra flavor.
The Ingredients That Shine the Most
Let’s highlight the stars.
Olive Oil: Gives richness and helps create that golden crust.
Garlic: Infuses the bread with a warm, savory aroma.
Let’s Bake This Together
Now comes the most satisfying part, bringing it all together.
- Preheat Your Equipment: Preheat oven to 400°F (200°C).
- Combine Ingredients: Mix warm water, yeast, and a little flour, then add remaining ingredients to form a soft dough.
- Prepare Your Cooking Vessel: Grease a baking pan with olive oil.
- Assemble the Dish: Spread the dough in the pan, dimple the surface, and top with garlic, herbs, and oil.
- Cook to Perfection: Bake for 20 to 25 minutes until golden brown.
- Finishing Touches: Let it cool slightly before slicing.
- Serve and Enjoy: Serve warm or at room temperature.
Texture and Flavor You Will Notice Right Away
The crust has a light crispness, while the inside stays soft and airy with small pockets throughout. The garlic and herbs sit right on top, giving each bite a burst of flavor that feels simple but incredibly satisfying.
Helpful Baking Tips
Want even better results? Keep these in mind.
- Let the dough rest if it feels too tight.
- Use your fingers gently when shaping.
- Add a little extra oil for a richer finish.
What to Avoid While Baking
Avoid these common mistakes.
- Skipping the rise can lead to dense bread.
- Using cold water can affect yeast activation.
- Overbaking can dry out the focaccia.
Nutrition Overview
Servings: 6
Calories per serving: 260
Note: These are approximate values.
Time Breakdown
Prep Time: 20 minutes
Cook Time: 25 minutes
Total Time: 45 minutes
Make-Ahead and Storage Tips
You can prepare the dough ahead and let it rise in the fridge. Once baked, store focaccia in an airtight container for up to two days. Reheat slightly to bring back its soft texture.
How to Serve It Best
Serve alongside soups, salads, or as a base for sandwiches. It also works beautifully as a simple snack with a drizzle of olive oil.
Creative Ways to Use Leftovers
Leftovers can easily turn into something new.
- Slice and toast for a crunchy snack.
- Use as sandwich bread.
- Cut into cubes for salads.
Extra Tips for Success
A few final touches can make a difference.
- Use fresh garlic for stronger flavor.
- Keep an eye on baking time.
- Let it cool slightly before cutting.
Make It Look Stunning
Serve on a simple plate and drizzle a little olive oil on top. The golden crust and herbs make it visually irresistible.
Variations to Try
- Add olives for a salty twist.
- Sprinkle cheese for extra richness.
- Use rosemary for a classic flavor.
- Add sun-dried tomatoes for depth.
FAQ’s
Q1: Can I use instant yeast?
Yes, it works just as well.
Q2: Can I make it gluten-free?
You can use a gluten-free flour blend.
Q3: How do I store it?
Keep it in an airtight container.
Q4: Can I freeze focaccia?
Yes, freeze in slices for convenience.
Q5: Why is my dough dense?
It may not have risen enough.
Q6: Can I add toppings?
Yes, many toppings work well.
Q7: How do I reheat it?
Warm in the oven for best texture.
Q8: Can I use fresh herbs?
Yes, they add great flavor.
Q9: Why dimple the dough?
It helps hold oil and toppings.
Q10: Can I make it thinner?
Yes, spread dough more evenly.
Conclusion
Garlic herb focaccia is one of those recipes that turns simple ingredients into something truly memorable. It is soft, flavorful, and comforting in every bite. Let me tell you, it’s worth every bite, and once you try it, it will quickly become a favorite in your kitchen.
Print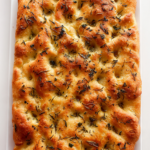
Garlic Herb Focaccia
- Prep Time: 20 minutes
- Cook Time: 25 minutes
- Total Time: 45 minutes
- Yield: 6 servings 1x
- Category: Bread
- Method: Baking
- Cuisine: Italian
- Diet: Vegan
Description
Soft and airy garlic herb focaccia with a golden crust, infused with olive oil and herbs for a comforting homemade bread experience.
Ingredients
- 3 cups all-purpose flour
- 1 1/4 cups warm water
- 2 1/4 teaspoons active dry yeast
- 1/4 cup olive oil
- 3 cloves garlic, minced
- 1 tablespoon dried herbs
- 1 teaspoon salt
Instructions
- Preheat oven to 400°F (200°C).
- Mix warm water, yeast, and a bit of flour, then add remaining ingredients to form dough.
- Grease a baking pan with olive oil.
- Spread dough in pan, dimple surface, and top with garlic, herbs, and oil.
- Bake for 20 to 25 minutes until golden brown.
- Let cool slightly before slicing.
- Serve and enjoy.
Notes
- Let dough rise fully for best texture
- Use quality olive oil
- Dimple dough to hold toppings
Nutrition
- Serving Size: 1 serving
- Calories: 260
- Sugar: 1g
- Sodium: 300mg
- Fat: 9g
- Saturated Fat: 1g
- Unsaturated Fat: 7g
- Trans Fat: 0g
- Carbohydrates: 38g
- Fiber: 2g
- Protein: 6g
- Cholesterol: 0mg


