
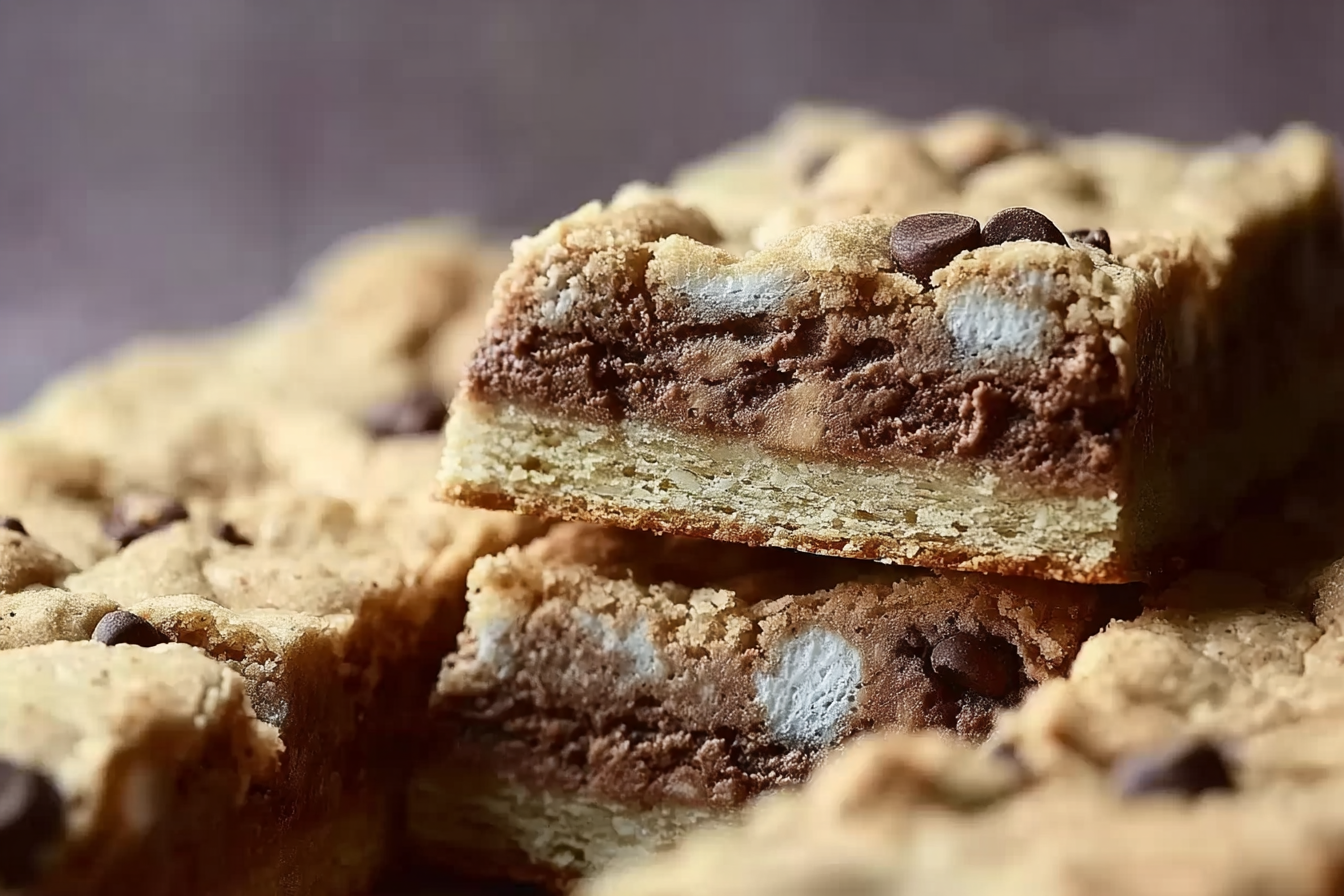
If you’ve never tried Mud Hen Bars, you’re in for a genuine treat. These retro dessert bars have a delightful combination of sweet layers featuring chocolate, coconut, nuts, and creamy fillings, making them a tasty and nostalgic favorite. Mud Hen Bars are surprisingly easy to bake, coming together with simple ingredients that deliver big flavor, perfect for satisfying any sweet tooth or impressing guests at your next gathering.
Why You’ll Love This Recipe
- Classic comfort: Mud Hen Bars bring a nostalgic vibe with their rich and layered textures that remind you of homemade goodness.
- Simple ingredients: Everyday pantry staples make this dessert approachable and budget-friendly without sacrificing flavor.
- Perfect balance: The combination of chewy coconut, crunchy nuts, and creamy filling creates a beautifully balanced bite every time.
- Make ahead friendly: Mud Hen Bars store well, making them an ideal option for preparing in advance for parties or busy weeks.
- Customizable: This recipe adapts effortlessly with dietary tweaks or flavor variations to suit your personal preference.
Ingredients You’ll Need
The magic behind Mud Hen Bars lies in a handful of simple yet essential ingredients that each bring their own charm to the final dessert. From the crust to the gooey middle, every element enhances either texture or taste with just the right amount of sweetness and richness.
- Butter: The foundation for a buttery, tender crust and to help bind the ingredients.
- Brown sugar: Adds warmth and a deep caramel flavor that complements the chocolate nicely.
- Flour: Provides structure for the base ensuring it holds all the delicious layers together.
- Coconut flakes: Bring a chewy, slightly sweet texture that cuts through the richness beautifully.
- Chopped nuts: Typically walnuts or pecans, adding crunch and a toasty flavor.
- Sweetened condensed milk: The secret to that luscious, creamy filling that binds the top layers flawlessly.
- Semi-sweet chocolate chips: Deliver melty pockets of chocolate that make each bite irresistibly indulgent.
Variations for Mud Hen Bars
One of the best things about Mud Hen Bars is how easy they are to customize, making this recipe flexible enough to cater to different tastes, dietary restrictions, or simply what you have on hand. Don’t be afraid to get creative and make this your signature dessert.
- Nut-free option: Substitute nuts with seeds like pumpkin or sunflower to keep the crunch and avoid allergens.
- Dairy-free swap: Use coconut oil instead of butter and dairy-free chocolate chips for a vegan-friendly treat.
- Flavored twist: Add a teaspoon of cinnamon or a dash of espresso powder to deepen the flavor profile.
- Chocolate variety: Experiment with white or dark chocolate chips for an entirely new taste experience.
- Extra coconut: Double the coconut flakes if you love that tropical chewiness shining through.

How to Make Mud Hen Bars
Step 1: Prepare the Crust
Start by combining softened butter, brown sugar, and flour in a mixing bowl. Mix until the ingredients come together into a crumbly dough. Press this mixture firmly into the bottom of a greased baking pan to form an even layer. This will serve as the sturdy yet tender base for your Mud Hen Bars.
Step 2: Add the Layer of Coconut and Nuts
Sprinkle shredded coconut and chopped nuts evenly over the crust. These ingredients add texture and a nutty flavor that contrasts beautifully with the smooth layers that follow.
Step 3: Pour on Sweetened Condensed Milk
Pour the sweetened condensed milk evenly over the coconut and nuts. This acts as a sweet, sticky glue and becomes wonderfully creamy once baked, helping all the layers meld together.
Step 4: Top with Chocolate Chips
Generously scatter semi-sweet chocolate chips on top of the wet layer. The melt-in-your-mouth chocolate enriches the dessert and creates beautiful gooey spots throughout each bar.
Step 5: Bake to Perfection
Place your pan in a preheated oven at 350°F (175°C) and bake for 25 to 30 minutes or until the edges turn golden brown and the chocolate chips have melted into a glossy, decadent layer.
Step 6: Cool and Cut
Once baked, allow the bars to cool fully in the pan on a wire rack. This lets the layers set properly. After cooling, slice into squares and get ready to enjoy your homemade Mud Hen Bars.
Pro Tips for Making Mud Hen Bars
- Use room temperature butter: Soften the butter beforehand to help it blend smoothly for an even crust.
- Don’t skip the cooling step: Cooling ensures clean cuts and bars that hold their shape when served.
- Even distribution: Make sure your coconut, nuts, and chocolate chips are spread evenly for a consistent taste in every bite.
- Choose quality chocolate: Using good-quality chips enhances the flavor and texture remarkably.
- Line your pan: Using parchment paper makes it easier to lift out the bars without crumbling.
How to Serve Mud Hen Bars
Garnishes
A light dusting of powdered sugar or a drizzle of melted chocolate adds a beautiful finishing touch that makes your Mud Hen Bars look as good as they taste. For a festive twist, sprinkle finely chopped nuts or a pinch of sea salt on top.
Side Dishes
Pairing these bars with a scoop of vanilla ice cream or a dollop of whipped cream elevates the dessert experience, balancing sweetness with creamy coolness. Fresh berries also work wonderfully alongside, adding a refreshing burst.
Creative Ways to Present
Serve Mud Hen Bars on a rustic wooden tray for a casual vibe or layer them in a beautiful dessert trifle with whipped cream and fruit for a party centerpiece. Wrapping individual bars in parchment makes for charming gifts or on-the-go treats.
Make Ahead and Storage
Storing Leftovers
Keep leftover Mud Hen Bars in an airtight container at room temperature for up to 3 days, or refrigerate for up to a week to maintain freshness and texture.
Freezing
Mud Hen Bars freeze beautifully. Wrap them tightly in plastic wrap and foil, then place them in a freezer-safe container for up to 3 months. Thaw overnight in the fridge before serving.
Reheating
To enjoy them warm, heat individual bars in the microwave for 15-20 seconds or in a preheated oven at 300°F (150°C) for 5-7 minutes. This helps revive the gooey chocolate and creamy layers.
FAQs
What are Mud Hen Bars?
Mud Hen Bars are a classic layered dessert bar featuring a crust, coconut, nuts, sweetened condensed milk, and chocolate chips, known for their rich and chewy texture.
Can I use different nuts in this recipe?
Absolutely! Walnuts and pecans are popular, but almonds, macadamia nuts, or even seeds can be used depending on your taste or allergies.
Are Mud Hen Bars gluten-free?
Traditional Mud Hen Bars are made with regular flour, but you can substitute gluten-free all-purpose flour to make a gluten-free version.
How long do Mud Hen Bars last?
Stored properly in an airtight container, these bars can last up to a week in the refrigerator and several months if frozen.
Can I make Mud Hen Bars vegan?
Yes! Substitute butter with coconut oil or vegan butter, use dairy-free chocolate chips, and check for sweetened condensed milk alternatives to create a vegan-friendly dessert.
Final Thoughts
There’s something truly special about Mud Hen Bars that makes them so easy to love: simple ingredients, a satisfying mix of textures, and that nostalgic charm. Whether you’re baking for a crowd or just craving a comforting homemade treat, give this recipe a try—you’ll quickly see why Mud Hen Bars are a retro dessert worth every bite.
Related Posts
- Coconut Raffaello Cake Recipe to Satisfy Your Sweet Tooth
- Easy Moist Date Cake for a Naturally Sweet Dessert
- Creamy Lactose Free Vanilla Ice Cream Everyone Will Love
Mud Hen Bars
- Prep Time: 15 minutes
- Cook Time: 25 to 30 minutes
- Total Time: 40 to 45 minutes
- Yield: 16 bars 1x
- Category: Desserts
- Method: Baking
- Cuisine: American
- Diet: Vegetarian
Description
Mud Hen Bars are a nostalgic layered dessert featuring a buttery crust, chewy coconut, crunchy nuts, creamy sweetened condensed milk filling, and melty semi-sweet chocolate chips. Easy to make with simple pantry ingredients, these bars offer a perfect balance of textures and flavors, ideal for parties, make-ahead treats, or comforting homemade indulgence.
Ingredients
For the Crust:
- 1 cup (226g) unsalted butter, softened
- 1 cup (220g) brown sugar, packed
- 2 cups (240g) all-purpose flour
For the Filling and Topping:
- 1 1/2 cups (135g) sweetened coconut flakes
- 1 cup (120g) chopped nuts (walnuts or pecans)
- 1 (14 oz) can sweetened condensed milk
- 1 1/2 cups (270g) semi-sweet chocolate chips
Instructions
- Prepare the Crust: Combine softened butter, brown sugar, and flour in a mixing bowl. Mix until crumbly dough forms. Press firmly into the bottom of a greased 9×13 inch baking pan to create an even layer.
- Add the Layer of Coconut and Nuts: Evenly sprinkle shredded coconut flakes and chopped nuts over the pressed crust to add texture and flavor contrast.
- Pour on Sweetened Condensed Milk: Pour the sweetened condensed milk evenly over the coconut and nuts, acting as a creamy binder for the layers.
- Top with Chocolate Chips: Generously scatter semi-sweet chocolate chips on top of the wet layer to create gooey chocolate spots while baking.
- Bake to Perfection: Bake the pan in a preheated 350°F (175°C) oven for 25 to 30 minutes, or until edges turn golden brown and chocolate melts into a glossy layer.
- Cool and Cut: Allow bars to cool fully on a wire rack in the pan to set layers properly. After cooling, slice into squares and serve.
Notes
- Use room temperature butter for a smoother crust blend.
- Do not skip cooling step to ensure clean cutting and bars holding shape.
- Distribute coconut, nuts, and chocolate chips evenly for consistent flavor in every bite.
- Choose high-quality chocolate chips for enhanced taste and texture.
- Line your baking pan with parchment paper for easy removal of bars without crumbling.
Nutrition
- Serving Size: 1 bar (approx. 2x2 inches)
- Calories: 280 kcal
- Sugar: 20g
- Sodium: 115mg
- Fat: 17g
- Saturated Fat: 10g
- Unsaturated Fat: 6g
- Trans Fat: 0g
- Carbohydrates: 28g
- Fiber: 2g
- Protein: 3g
- Cholesterol: 45mg