
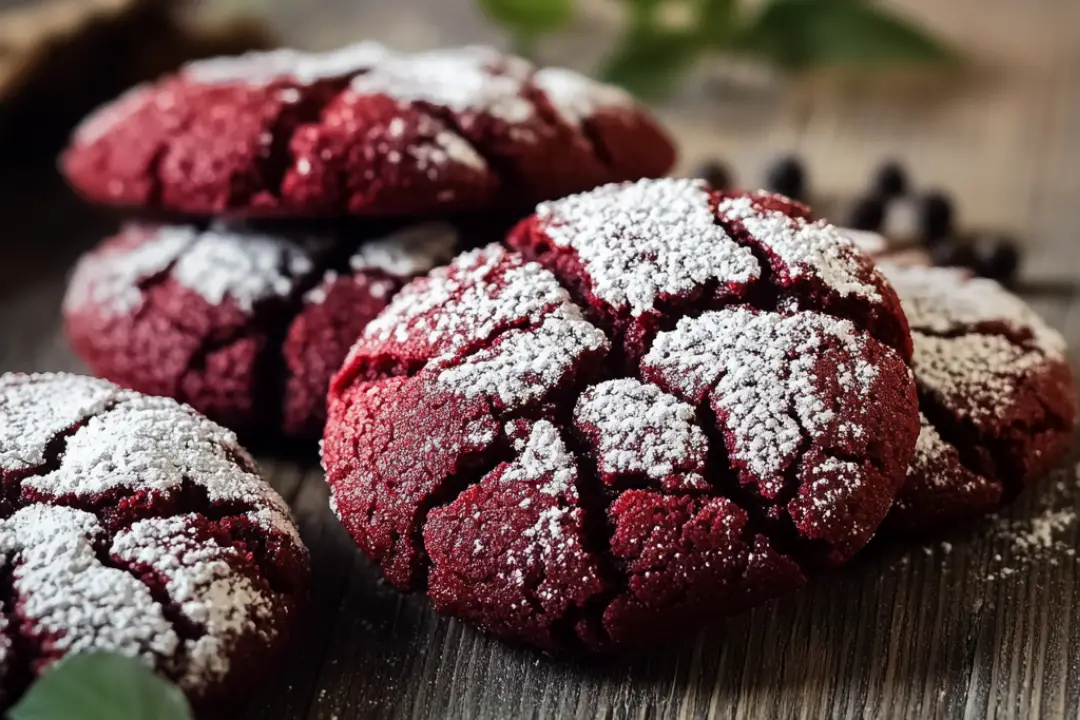
Okay, friends, let me tell you about these Red Velvet Crinkle Cookies. If you love a cookie that’s rich, soft, and just a little bit fancy, then you’re going to adore these little gems. They’re not only gorgeous with their signature red hue and white crinkly sugar top, but the flavor is a perfect blend of vanilla and cocoa. Plus, they’re a total crowd-pleaser—whether you’re making them for a special occasion, gifting them, or just treating yourself, trust me, these cookies are an instant favorite.
Why You’ll Love Red Velvet Crinkle Cookies
This isn’t just any cookie recipe. It’s the kind of recipe that makes you feel like a pro baker with minimal effort. Here’s why these cookies are such a hit:
- Versatile: These cookies work for everything from holiday parties to casual treats on a random Wednesday. They’re eye-catching and delicious enough to serve at any event!
- Budget-Friendly: You don’t need any crazy expensive ingredients—just simple pantry staples like flour, cocoa powder, and sugar. These are the kind of cookies you can make on a whim.
- Quick and Easy: It only takes about 20 minutes to prep and pop these cookies into the oven. No complicated steps here—just pure, effortless cookie-making.
- Customizable: You can add a few extras like chocolate chips or chopped nuts if you’re feeling extra, or keep them simple. Either way, they’re irresistible.
- Showstopper Appearance: The red velvet color and crinkly, sugar-coated exterior make these cookies a total showstopper. People will be asking you for the recipe before they even finish the first bite.

Ingredients
Here’s everything you need to make these soft, indulgent Red Velvet Crinkle Cookies. Each ingredient plays its part to create that perfect, melt-in-your-mouth texture and signature flavor.
All-Purpose Flour
Flour is the base of any cookie, and here it helps create the chewy texture we all love. The right amount of flour makes sure the cookies spread out just enough while staying soft.
Cocoa Powder
This gives the cookies that rich, chocolatey flavor. You don’t need a lot, just enough to balance the sweetness and give them a hint of cocoa that pairs perfectly with the red velvet.
Baking Powder
A little baking powder helps these cookies rise just right, ensuring they’re fluffy and chewy in the center while still holding their shape.
Salt
Just a pinch of salt enhances all the flavors, cutting through the sweetness and making every bite a little more balanced.
Granulated Sugar
Sugar not only sweetens the cookies, but it also gives them that perfect crisp around the edges, creating a delightful contrast to the soft middle.
Brown Sugar
Brown sugar adds a rich, molasses-like sweetness and helps keep the cookies soft. It’s the secret to that melt-in-your-mouth texture.
Butter
Butter adds that irresistible richness and a subtle flavor that takes these cookies from good to great. Make sure it’s softened, so it mixes in perfectly.
Eggs
Eggs bind everything together and help give the cookies structure. They also help with the soft texture we’re after.
Red Food Coloring
Here’s where the magic happens—red food coloring gives these cookies their vibrant color. You can go bold with the color or keep it subtle, depending on your preference.
Vanilla Extract
Vanilla adds warmth and depth to the flavor. It complements the cocoa powder and balances the sweetness of the sugars.
Powdered Sugar
The powdered sugar is what gives these cookies their signature crinkled look. Rolling the dough balls in powdered sugar before baking ensures they get that beautiful, cracked exterior.
(Note: the full ingredients list, including measurements, is provided in the recipe card directly below.)
Instructions
Now that you have everything you need, let’s get baking! These Red Velvet Crinkle Cookies come together quickly and easily, so you can enjoy them in no time.
Preheat the Oven
Preheat your oven to 350°F (175°C) to make sure it’s nice and hot when the cookies are ready to bake. This will help them cook evenly and get that perfect texture.
Prepare Your Baking Sheets
Line two baking sheets with parchment paper or silicone baking mats. This helps prevent the cookies from sticking and ensures they bake evenly.
Mix the Dry Ingredients
In a medium bowl, whisk together the flour, cocoa powder, baking powder, and salt. This ensures all the dry ingredients are well distributed, which will help the cookies turn out perfect.
Cream the Butter and Sugars
In a large bowl, beat the softened butter with the granulated sugar and brown sugar until light and fluffy. This step helps incorporate air into the dough, giving the cookies that soft, chewy texture.
Add the Eggs, Food Coloring, and Vanilla
Next, add the eggs one at a time, beating well after each addition. Then mix in the red food coloring and vanilla extract until fully combined. The batter will be a beautiful red color at this point.
Combine Wet and Dry Ingredients
Gradually add the dry ingredients to the wet ingredients, mixing just until combined. Be careful not to overmix—this can make the cookies tough.
Form the Cookie Dough Balls
Using a spoon or your hands, scoop out tablespoon-sized portions of dough and roll them into balls. Roll each ball in the powdered sugar until it’s fully coated. This is what gives the cookies their signature crinkled, snowy finish.
Bake the Cookies
Place the dough balls on your prepared baking sheets, spacing them about 2 inches apart. Bake for 8-10 minutes, or until the edges are set and the centers are still slightly soft. The cookies will continue to cook a bit as they cool.
Cool and Enjoy
Let the cookies cool on the baking sheets for about 5 minutes before transferring them to a wire rack to cool completely. The wait is hard, but it’s totally worth it!
Nutrition Facts
Servings: 24 cookies
Calories per serving: 120
Preparation Time
Prep Time: 15 minutes
Cook Time: 8-10 minutes
Total Time: 25 minutes
How to Serve Red Velvet Crinkle Cookies
These cookies are perfect on their own, but here are a few fun ways to serve them or use them for special occasions:
- Gift them: Pack them in a cute cookie tin or box and give them as a gift. Who wouldn’t love getting a batch of these festive cookies?
- Pair with milk: The classic cookie and milk combo never fails. Dip these cookies in a cold glass of milk and let the flavors melt together.
- Serve at Parties: With their eye-catching color and crinkled top, these cookies are a perfect addition to a dessert table. Guests will be asking for more!
- On a platter with other treats: Mix them with other cookies like chocolate chip or snickerdoodle for a colorful cookie assortment that will impress.
Additional Tips
Here are a few helpful tips to make these Red Velvet Crinkle Cookies even better:
- Don’t skip the powdered sugar: It’s key for getting that crinkly exterior that makes these cookies so unique. Be generous with the coating!
- Let the dough chill: If you have time, chill the dough for about 30 minutes before rolling it into balls. This helps the cookies hold their shape and prevents them from spreading too much while baking.
- Use gel food coloring: Gel food coloring is more concentrated than liquid food coloring, so it gives a brighter red without watering down the dough.
- Make a double batch: These cookies disappear fast, so make extra! They freeze well, so you can enjoy them later.
- Change up the flavors: Add some white chocolate chips or even a cream cheese drizzle on top for an extra indulgent treat.
FAQ Section
Q1: Can I use liquid food coloring instead of gel?
A1: Yes, you can use liquid food coloring, but gel food coloring will give a more vibrant red color without affecting the dough’s consistency.
Q2: Can I make these cookies ahead of time?
A2: Absolutely! You can make the dough ahead of time, roll it into balls, and store it in the fridge for up to 3 days. Then just bake them when you’re ready.
Q3: How should I store these cookies?
A3: Store them in an airtight container at room temperature for up to a week. They’ll stay soft and fresh!
Q4: Can I freeze these cookies?
A4: Yes! Freeze the baked cookies in an airtight container for up to 3 months. To enjoy, just let them thaw at room temperature or warm them up in the microwave.
Q5: Can I add chocolate chips to the dough?
A5: Absolutely! Feel free to mix in some white or dark chocolate chips for a little extra sweetness and texture.
Q6: How can I prevent my cookies from spreading too much?
A6: Be sure to chill the dough for 30 minutes before baking to help the cookies hold their shape and prevent them from spreading too much.
Q7: Can I use a different type of sugar?
A7: You can use coconut sugar or other alternatives, but keep in mind it may change the texture slightly. Brown and granulated sugars are what help make these cookies chewy.
Q8: Can I make these gluten-free?
A8: Yes, you can use a gluten-free all-purpose flour blend to make these cookies gluten-free. Just make sure the flour blend contains xanthan gum or another binder.
Q9: What makes these cookies different from regular chocolate crinkle cookies?
A9: The signature red color and subtle flavor of cocoa and vanilla make these cookies distinctly “red velvet,” as opposed to regular chocolate crinkles.
Q10: Can I make these cookies without food coloring?
A10: You can! While they won’t have the signature red hue, they’ll still taste delicious and have that same soft, chewy texture.
Conclusion
Red Velvet Crinkle Cookies are everything you want in a cookie—soft, sweet, and with just a little something extra. They’re so easy to make and perfect for sharing, so get ready to impress your friends and family with these delicious treats. Whether it’s for a special occasion or just because, these cookies will bring smiles to everyone who tries them. Happy baking!
Print
Red Velvet Crinkle Cookies
- Prep Time: 10 minutes (plus 30 minutes chilling)
- Cook Time: 10-12 minutes per batch
- Total Time: 50-55 minutes
- Yield: Approximately 20–24 cookies 1x
- Category: Dessert
- Method: baking
- Cuisine: American
Description
These soft, chewy Red Velvet Crinkle Cookies are bursting with rich red velvet flavor. With their striking powdered sugar coating and festive color, they make the perfect treat for Valentine’s Day, Christmas, or any occasion you want a special, delicious dessert!
Ingredients
- 1 box red velvet cake mix (15.25 oz)
- 2 large eggs, room temperature
- 1/3 cup vegetable oil
- 1 tsp vanilla extract
- 1/2 cup powdered sugar
- 1 tsp cornstarch (optional, for extra coating)
Instructions
-
Prepare the Dough:
- In a large mixing bowl, combine the red velvet cake mix, eggs, vegetable oil, and vanilla extract. Mix until a soft dough forms.
- Cover the bowl with plastic wrap and refrigerate the dough for 30 minutes to make it easier to handle.
-
Preheat the Oven:
- Preheat your oven to 350°F (175°C). Line baking sheets with parchment paper or silicone baking mats.
-
Prepare the Coating:
- In a shallow bowl, mix the powdered sugar and cornstarch (if using).
-
Shape and Coat the Cookies:
- Scoop tablespoon-sized portions of the chilled dough and roll them into balls.
- Generously roll each ball in the powdered sugar mixture until fully coated.
-
Bake:
- Place the coated dough balls on the prepared baking sheets, spacing them about 2 inches apart.
- Bake for 10-12 minutes, or until the cookies are set and the tops have a beautiful crackle appearance.
- Remove from the oven and allow the cookies to cool on the baking sheets for 2 minutes before transferring them to a wire rack to cool completely.
-
Serve and Enjoy:
- These cookies are perfect on their own or paired with a glass of milk.
Notes
- Refrigerating the dough helps make the cookies easier to shape and ensures they hold their shape better when baking.
- For extra flavor, you can add a teaspoon of cocoa powder to the dough.
- These cookies make a great gift for holidays or a special occasion.
Nutrition
- Serving Size: 1 cookie
- Calories: 130 kcal
- Sugar: 16g
- Sodium: 95mg
- Fat: 5g
- Saturated Fat: 0g
- Unsaturated Fat: 0g
- Trans Fat: 0g
- Carbohydrates: 18g
- Fiber: 0g
- Protein: 1g
- Cholesterol: 15mg