
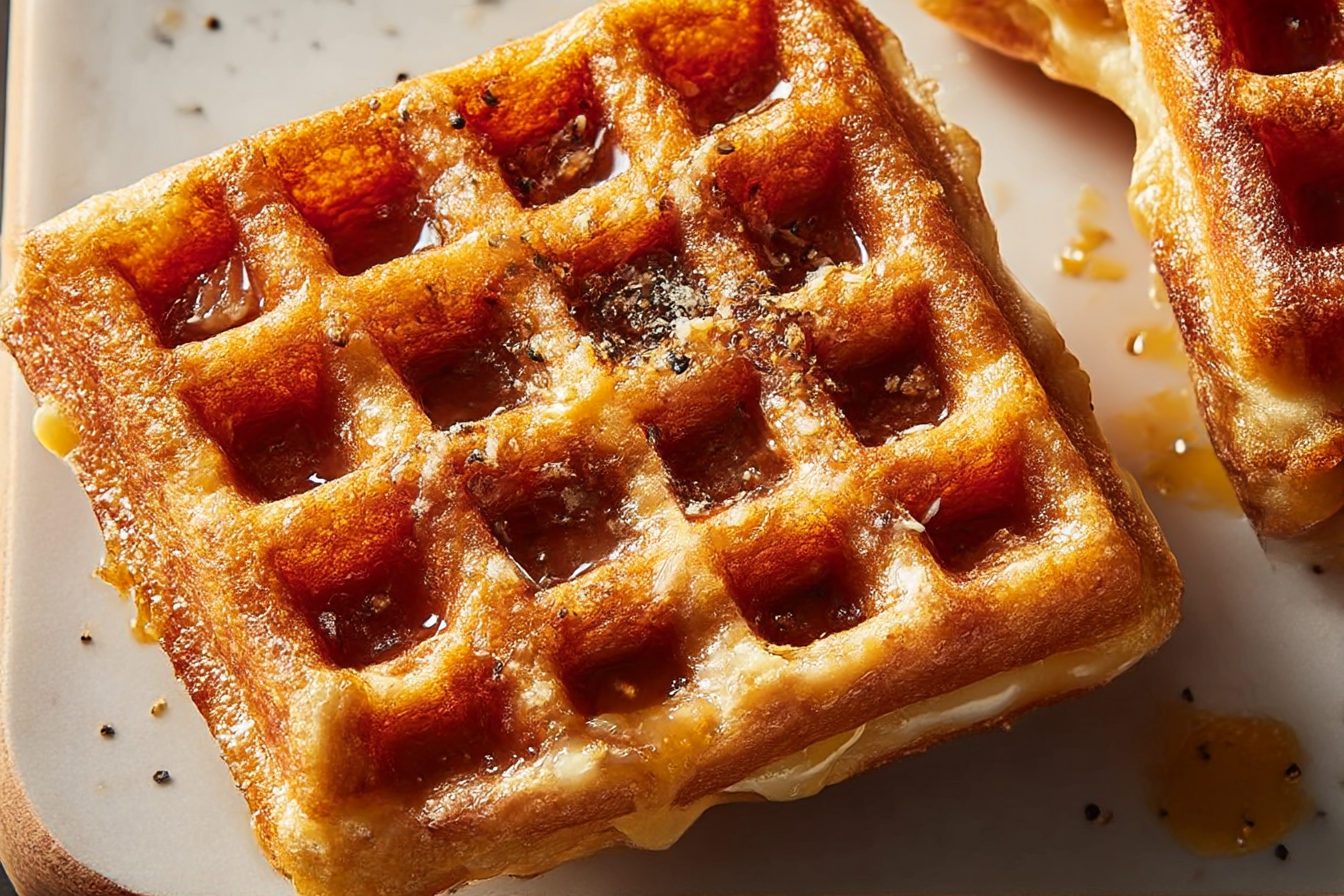
If you thought grilled cheese couldn’t get any better, wait until you press it in a waffle iron. The result? A beautifully crisp, golden crust with those irresistible waffle grid marks, and warm, gooey cheese inside. This Waffled Grilled Cheese is the ultimate shortcut to crispy, cheesy happiness—and it’s as fun to make as it is to eat.
Behind the Recipe
This one came about on a lazy Sunday when I didn’t want to babysit a skillet. Out came the waffle iron, in went a classic grilled cheese, and what came out was pure magic. The crispiness was on another level, and the best part? No flipping, no mess, just set it and forget it. It’s now one of my go-tos for quick lunches and fun dinner nights.
Recipe Origin or Trivia
Waffle irons aren’t just for breakfast anymore. Creative home cooks have been using them to press everything from cinnamon rolls to brownies, and grilled cheese is one of the most satisfying twists. The evenly distributed heat gives you maximum crunch without drying out the bread—and the cheese melts beautifully under pressure.
Why You’ll Love Waffled Grilled Cheese
Here’s why it’s about to be your new obsession:
- Super crisp outside, melty cheese inside
- No flipping required—set it and forget it
- Fun for kids and grown-ups alike
- Customizable with endless filling options
- Quick cleanup—no greasy pan
- Great for lunches, snacks, or easy dinners
Chef’s Pro Tips for Perfect Results
- Butter the outside of the bread, not the inside.
- Use shredded cheese for faster, more even melt.
- Don’t overfill—too much cheese and it leaks.
- Let it rest for 1–2 minutes before slicing for best cheese pull.
- Keep pressure light—don’t squash it too much in the waffle iron.
Kitchen Tools You’ll Need
- Waffle iron (any kind, Belgian or classic)
- Butter knife or brush
- Spatula for lifting
- Small bowl for butter
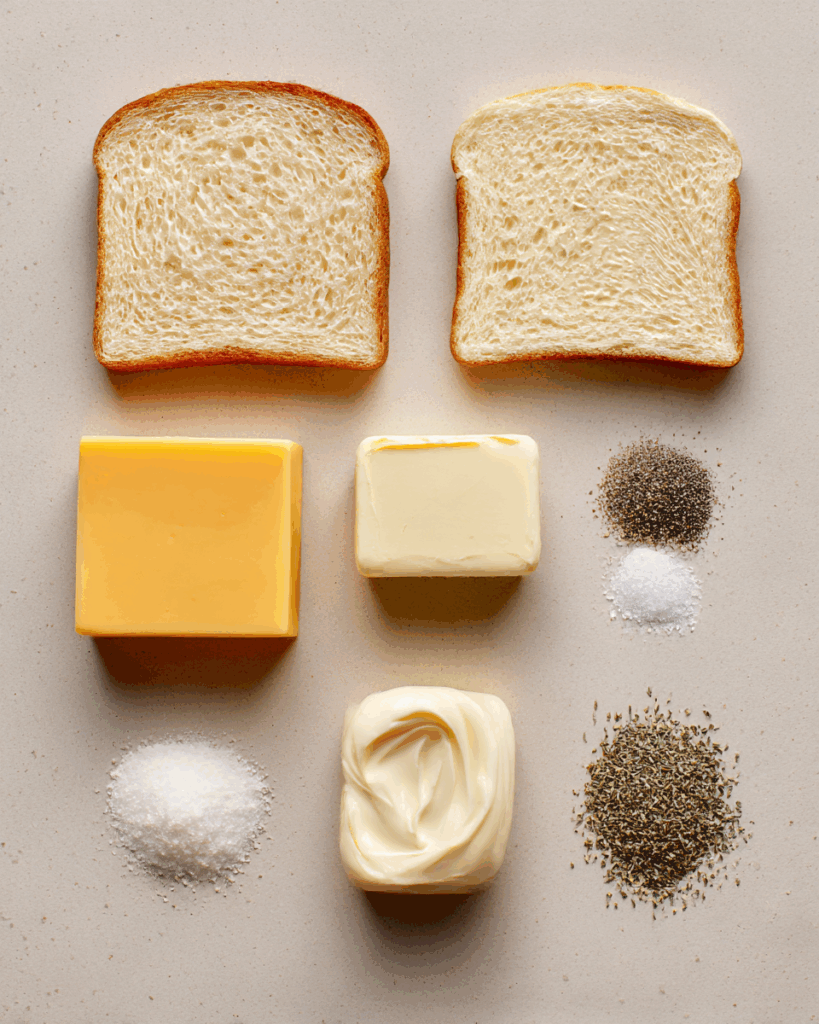
Ingredients in Waffled Grilled Cheese
You only need a few pantry staples:
- 2 slices of Bread (sourdough, white, whole wheat—all work)
- 1/2 cup Shredded Cheese (cheddar, mozzarella, or a mix)
- 1 tablespoon Butter or Mayonnaise
Optional add-ins:
- Tomato slices
- Cooked bacon
- Pesto
- Caramelized onions
Ingredient Substitutions
- Use mayo instead of butter for a tangy, golden finish.
- Vegan? Use dairy-free cheese and butter alternatives.
- Gluten-free bread works fine too—just toast a bit longer.
Ingredient Spotlight
Cheese – The star of the show. Cheddar melts like a dream and gives that classic flavor, but mixing in mozzarella, gouda, or pepper jack adds oozy texture and extra punch. Avoid hard cheeses that don’t melt well on their own.
Instructions for Making Waffled Grilled Cheese
Let’s make it in under 10 minutes:
-
Preheat your waffle iron.
Lightly oil it if needed (most nonstick ones don’t require it). -
Assemble the sandwich.
Butter the outside of each bread slice. Pile cheese in the middle, keeping it away from the edges. -
Press and cook.
Place the sandwich in the waffle iron and close gently. Don’t press too hard. Cook for 3–5 minutes until golden and crispy. -
Cool and slice.
Let it rest 1–2 minutes before slicing to avoid losing all that glorious cheese.
Texture & Flavor Secrets
The waffle press gives it evenly crispy edges and little wells that catch extra butter or sauce. Inside, it’s all about warm, gooey cheese and toasty bread. Want spice? Add jalapeños. Want sweet-savory? Try fig jam with brie.
Cooking Tips & Tricks
- Line your waffle iron with parchment for easier cleanup.
- Don’t use super airy bread—it compresses too much.
- Add a second layer of cheese on both bread slices for max melt.
What to Avoid
- Overloading—too much cheese or fillings can make a mess.
- Unbuttered bread—dry bread won’t crisp well.
- Opening the waffle iron too early—let the cheese melt and crust form.
Nutrition Facts
Serving Size: 1 sandwich
Calories: ~350
Fat: 22g
Carbs: 28g
Protein: 12g
Varies depending on bread and cheese choices.
Preparation Time
Prep Time: 5 minutes
Cook Time: 5 minutes
Total Time: 10 minutes
Make-Ahead and Storage Tips
- Make the sandwich and wrap it tightly to grill later.
- Reheat in waffle iron for a quick warm-up.
- Not ideal for freezing, but okay refrigerated for 1 day.
How to Serve Waffled Grilled Cheese
- With tomato soup (of course)
- Sliced into strips for dipping
- With salad for a light lunch
- Cut into quarters for party snacks
Creative Leftover Transformations
- Dice and toss in a salad for a crouton upgrade
- Make mini versions for appetizers
- Turn into grilled cheese croutons for soup
Additional Tips
- Add mustard or aioli inside for a flavor kick
- Dust with Parmesan before pressing for a crispier crust
- Use flavored butters like garlic herb or chili lime
Variations to Try
- Caprese: Mozzarella, tomato, basil
- Breakfast: Scrambled egg and cheddar
- Ham & Swiss: Classic deli twist
- Spicy Jalapeño Popper: Cream cheese, cheddar, jalapeños
FAQ’s
Q1: Can I use a panini press instead?
A1: Yes, though the texture will be different. Waffle irons give deeper crisp.
Q2: How do I keep it from sticking?
A2: Use butter and a nonstick waffle iron—or lightly oil the plates.
Q3: What cheese melts best?
A3: Cheddar, mozzarella, gouda, and Monterey Jack are all great choices.
Q4: Can I make a batch for a crowd?
A4: Yes, keep them warm in a 200°F oven until ready to serve.
Q5: Can kids help with this?
A5: Totally! Just supervise the waffle iron.
Conclusion
Waffled Grilled Cheese turns a classic into something crispier, gooier, and even more fun. With just a few ingredients and no flipping required, it’s perfect for busy days, snack attacks, or anytime you need comfort food in minutes. So plug in that waffle iron and let the melty magic happen!
Print
Waffled Grilled Cheese
- Prep Time: 5 minutes
- Cook Time: 5 minutes
- Total Time: 10 minutes
- Yield: 1 sandwich 1x
- Category: Lunch
- Method: Waffle Iron
- Cuisine: American
- Diet: Vegetarian
Description
Golden, crispy, and filled with melty cheese, this Waffled Grilled Cheese is the easiest upgrade to your classic sandwich—made right in the waffle maker!
Ingredients
- 2 slices of Bread (sourdough, white, or whole wheat)
- 1/2 cup Shredded Cheese (cheddar, mozzarella, or a mix)
- 1 tablespoon Butter or Mayonnaise
- Optional: Tomato slices, Cooked Bacon, Pesto, Caramelized Onions
Instructions
- Preheat waffle iron. Lightly grease if needed.
- Butter the outside of each bread slice.
- Place shredded cheese between the slices, keeping it away from edges.
- Place sandwich in waffle iron and close gently. Cook 3–5 minutes until golden and crisp.
- Let cool 1–2 minutes before slicing. Serve warm.
Notes
- Use mayo instead of butter for extra flavor.
- Shredded cheese melts faster and more evenly than slices.
- Don’t overfill to avoid cheese leakage.
Nutrition
- Serving Size: 1 sandwich
- Calories: 350
- Sugar: 2g
- Sodium: 540mg
- Fat: 22g
- Saturated Fat: 11g
- Unsaturated Fat: 10g
- Trans Fat: 0g
- Carbohydrates: 28g
- Fiber: 2g
- Protein: 12g
- Cholesterol: 40mg