

There’s something magical about the smell of garlic bread baking in the oven. That buttery, garlicky aroma swirling through the kitchen is enough to make everyone come running. And when it’s topped with gooey melted cheese and finished with a sprinkle of fresh parsley, you’ve got a side dish that could easily steal the show. This Easy Cheesy Garlic Bread is everything you crave — crisp edges, soft insides, and enough cheese pull to make your heart skip a beat.
Behind the Recipe
This one brings back memories of Friday night pasta dinners, where the garlic bread was often more exciting than the main dish. My mom always made hers with a generous swipe of butter, a mountain of cheese, and more garlic than most people thought was appropriate. We’d fight over the bubbliest corner piece and sneak seconds before the pasta hit the table. This recipe is an ode to those moments — quick, satisfying, and totally irresistible.
Recipe Origin or Trivia
Garlic bread as we know it has roots in the Italian bruschetta, which dates back centuries. But the cheesy, buttery American version became wildly popular in the 1940s and 50s, especially alongside spaghetti and lasagna. While Italians tend to use olive oil and fresh garlic, the American twist piles on butter and cheese, creating that rich, indulgent flavor we’ve all come to love. It’s now a staple in pizzerias and home kitchens across the country.
Why You’ll Love Easy Cheesy Garlic Bread
You’ll be amazed how just a few ingredients can turn simple bread into something crave-worthy.
Versatile: Perfect with pasta, soups, salads, or on its own as a snack.
Budget-Friendly: Uses basic pantry and fridge staples.
Quick and Easy: Ready in under 20 minutes from start to finish.
Customizable: Add herbs, switch up cheeses, or use different bread.
Crowd-Pleasing: No one can resist that cheesy golden crust.
Make-Ahead Friendly: Prepare ahead and bake when ready to serve.
Great for Leftovers: Reheat in the oven and it’s as good as new.
Chef’s Pro Tips for Perfect Results
Let’s make this loaf the best on the table. Here’s what you need to know:
- Use softened butter so it spreads easily and blends with garlic.
- Grate your own cheese for maximum melt and flavor — pre-shredded doesn’t melt as well.
- Broil for the last minute or two to get golden bubbly cheese.
- Don’t skip the parsley — it adds a fresh pop and balances the richness.
- For extra garlic punch, rub a raw clove on the cut sides of the bread before buttering.
Kitchen Tools You’ll Need
You don’t need much to make cheesy garlic magic happen — just a few trusty basics:
Baking Sheet: To hold both halves of your bread and catch any cheese drips.
Mixing Bowl: For blending butter, garlic, and cheese.
Bread Knife: Essential for slicing the loaf cleanly.
Pastry Brush or Spoon: To spread the garlic butter evenly.
Aluminum Foil or Parchment Paper: For easy cleanup.
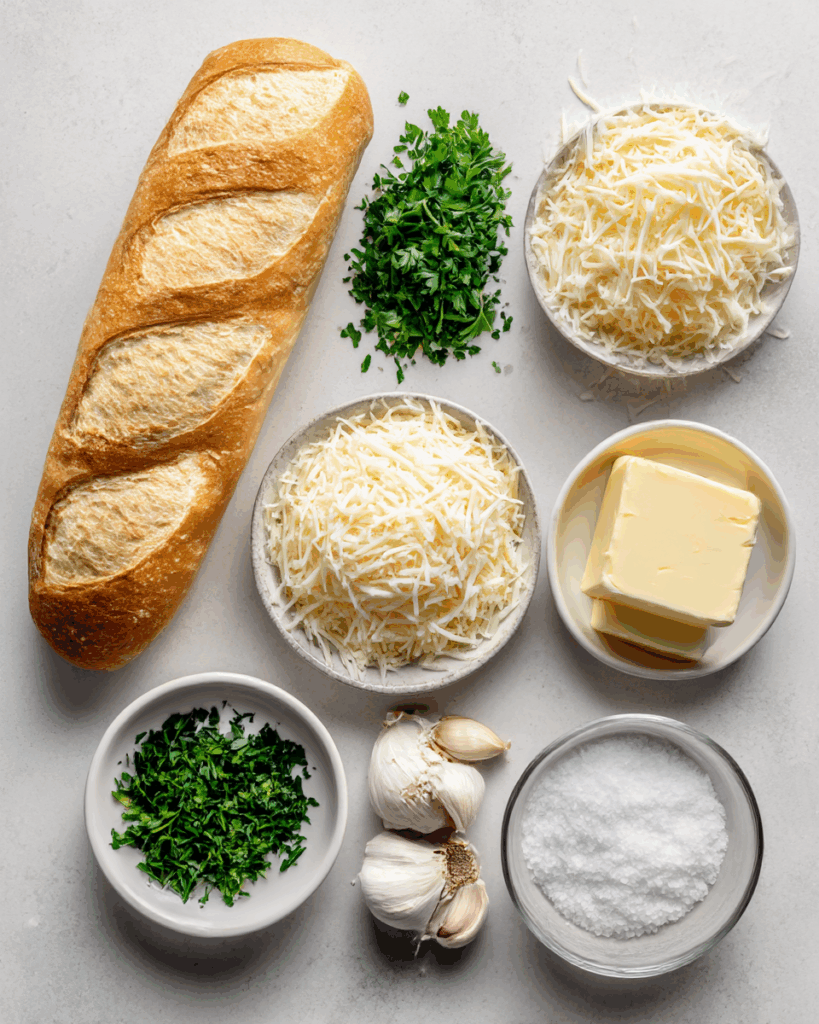
Ingredients in Easy Cheesy Garlic Bread
This combo is all about comfort, and each ingredient brings its own flair to the table.
- French Bread Loaf: 1 large — Soft inside, crisp crust, perfect for holding toppings.
- Shredded Mozzarella Cheese: 1 1/2 cups — Melts into that signature stretchy, gooey topping.
- Grated Parmesan Cheese: 1/2 cup — Adds salty sharpness and golden crisp edges.
- Unsalted Butter: 1/2 cup (1 stick), softened — Rich and creamy base for the garlic.
- Fresh Garlic Cloves: 4, minced — The bold, aromatic heart of the recipe.
- Chopped Parsley: 2 tablespoons — Brings freshness and a splash of color.
- Salt: 1/4 teaspoon — Enhances every other flavor in the mix.
Ingredient Substitutions
Short on something? No problem — here’s how to swap smart:
French Bread: Italian loaf or ciabatta works great too.
Mozzarella Cheese: Provolone or Monterey Jack for a twist.
Parmesan Cheese: Pecorino Romano or Asiago for bolder flavor.
Unsalted Butter: Salted butter (just reduce added salt).
Fresh Garlic: Garlic powder in a pinch — use 1 teaspoon.
Ingredient Spotlight
Mozzarella Cheese: The queen of cheese pulls, mozzarella melts like a dream and gives this bread its craveable gooeyness.
Fresh Garlic: Mincing fresh cloves gives the most potent, savory punch — don’t settle for jarred here if you can help it.
Instructions for Making Easy Cheesy Garlic Bread
Let’s bring that heavenly aroma into your kitchen. It’s fast, foolproof, and crazy delicious.
- Preheat Your Equipment: Preheat your oven to 400°F (200°C). Line a baking sheet with parchment paper or foil.
- Combine Ingredients: In a bowl, mix softened butter, minced garlic, salt, and half of the chopped parsley.
- Prepare Your Cooking Vessel: Slice the French bread in half lengthwise and place cut-side up on your lined baking sheet.
- Assemble the Dish: Spread the garlic butter evenly over both bread halves. Top with mozzarella and sprinkle with Parmesan.
- Cook to Perfection: Bake for 10–12 minutes until cheese is melted and bubbly. Broil for 1–2 minutes to get golden brown on top.
- Finishing Touches: Remove from oven and sprinkle with remaining parsley. Let cool slightly.
- Serve and Enjoy: Slice into thick strips or small pieces and serve hot.
Texture & Flavor Secrets
The beauty of this bread is all in the layers — the crispy toasted bottom, the rich buttery middle, and the gooey, golden cheese top. The garlic doesn’t overpower, it melts into the butter and creates a warm, savory flavor that’s addicting with every bite.
Cooking Tips & Tricks
These simple tweaks will level up your garlic bread game:
- Use fresh bakery bread for the best texture and flavor.
- For a spicy kick, sprinkle on red pepper flakes.
- Want ultra-richness? Add a few tablespoons of cream cheese to the butter mixture.
What to Avoid
Garlic bread seems simple, but a few mistakes can mess with the magic:
- Don’t use cold butter — it won’t spread evenly.
- Avoid over-baking or it’ll turn too hard and dry.
- Don’t skimp on garlic — it’s the soul of the dish.
Nutrition Facts
Servings: 8
Calories per serving: 260
Note: These are approximate values.
Preparation Time
Prep Time: 10 minutes
Cook Time: 12 minutes
Total Time: 22 minutes
Make-Ahead and Storage Tips
You can prep the garlic butter mixture ahead of time and refrigerate for up to 3 days. Or assemble the bread, wrap it in foil, and refrigerate until ready to bake. Leftovers can be stored in an airtight container in the fridge for up to 3 days — reheat in the oven to restore the crispiness.
How to Serve Easy Cheesy Garlic Bread
This bread is the ultimate sidekick to pasta dishes like spaghetti or baked ziti. It also goes great with soups — especially tomato or creamy broccoli — and is amazing on appetizer platters with dips or marinara sauce.
Creative Leftover Transformations
Got extras? You’re in luck — they’re amazing in new forms.
- Garlic Bread Grilled Cheese: Sandwich with more cheese and grill until golden.
- Croutons: Cube and toast for crunchy salad toppers.
- Pizza Base: Top leftover slices with sauce and toppings, then broil.
Additional Tips
- Add herbs like thyme or oregano for an Italian twist.
- Drizzle with olive oil after baking for a glossy finish.
- For individual portions, slice bread into smaller pieces before baking.
Make It a Showstopper
Serve on a wooden board with a side of marinara, or present in a bread basket lined with a checkered cloth. Sprinkle a little extra parmesan and parsley on top right before serving for that wow factor.
Variations to Try
- Three-Cheese Garlic Bread: Use mozzarella, cheddar, and provolone.
- Garlic Herb Butter: Mix in rosemary, thyme, and basil for added depth.
- Spicy Jalapeño: Add thinly sliced jalapeños under the cheese.
- Vegan Version: Use plant-based butter and dairy-free cheese.
- Mushroom Topping: Add sautéed mushrooms before baking for an umami hit.
FAQ’s
Q1: Can I make this ahead of time?
A1: Yes! Assemble and refrigerate, then bake fresh before serving.
Q2: Can I use pre-shredded cheese?
A2: You can, but freshly shredded melts better and tastes richer.
Q3: What’s the best bread to use?
A3: French bread or Italian loaf with a crisp crust and soft inside.
Q4: Can I freeze garlic bread?
A4: Absolutely. Wrap tightly in foil and freeze, then bake from frozen.
Q5: Can I use garlic powder?
A5: Yes, use 1 teaspoon if fresh garlic isn’t available.
Q6: How do I reheat leftovers?
A6: Wrap in foil and warm in the oven at 350°F until heated through.
Q7: Is it okay to skip parsley?
A7: Sure, but it adds a nice freshness and color.
Q8: Can I make this without cheese?
A8: Totally — just garlic butter is still delicious.
Q9: What if I don’t have an oven?
A9: Use a toaster oven or even a stovetop grill pan.
Q10: Can I add protein?
A10: Yes, add cooked crumbled sausage or pepperoni before baking.
Conclusion
Easy Cheesy Garlic Bread is that side dish you never knew you needed — until now. Crispy, buttery, cheesy, and loaded with garlicky goodness, it turns any meal into something memorable. Whether you’re serving it with spaghetti or sneaking a piece at midnight, trust me, it’s worth every golden bite.
Print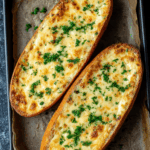
Easy Cheesy Garlic Bread
Description
This Easy Cheesy Garlic Bread is loaded with buttery garlic flavor, melty mozzarella, and a sprinkle of fresh parsley — the ultimate sidekick for any meal or the perfect standalone snack.
Ingredients
- 1 large French bread loaf
- 1 1/2 cups shredded mozzarella cheese
- 1/2 cup grated parmesan cheese
- 1/2 cup unsalted butter, softened
- 4 garlic cloves, minced
- 2 tablespoons chopped parsley
- 1/4 teaspoon salt
Instructions
- Preheat oven to 400°F (200°C) and line a baking sheet with parchment or foil.
- In a bowl, mix softened butter, minced garlic, salt, and half of the parsley.
- Slice the French bread loaf in half lengthwise and place cut-side up on the baking sheet.
- Spread the garlic butter mixture evenly on each bread half.
- Sprinkle mozzarella cheese and parmesan over the top.
- Bake for 10–12 minutes until the cheese is melted and bubbly.
- Broil for 1–2 minutes to get golden spots on top.
- Remove from oven, sprinkle with remaining parsley, slice, and serve warm.
Notes
- Use fresh garlic for the best flavor boost.
- Let butter soften to spread easily without tearing the bread.
- Add red pepper flakes for a spicy version.
- Use parchment for easy cleanup and non-stick baking.