
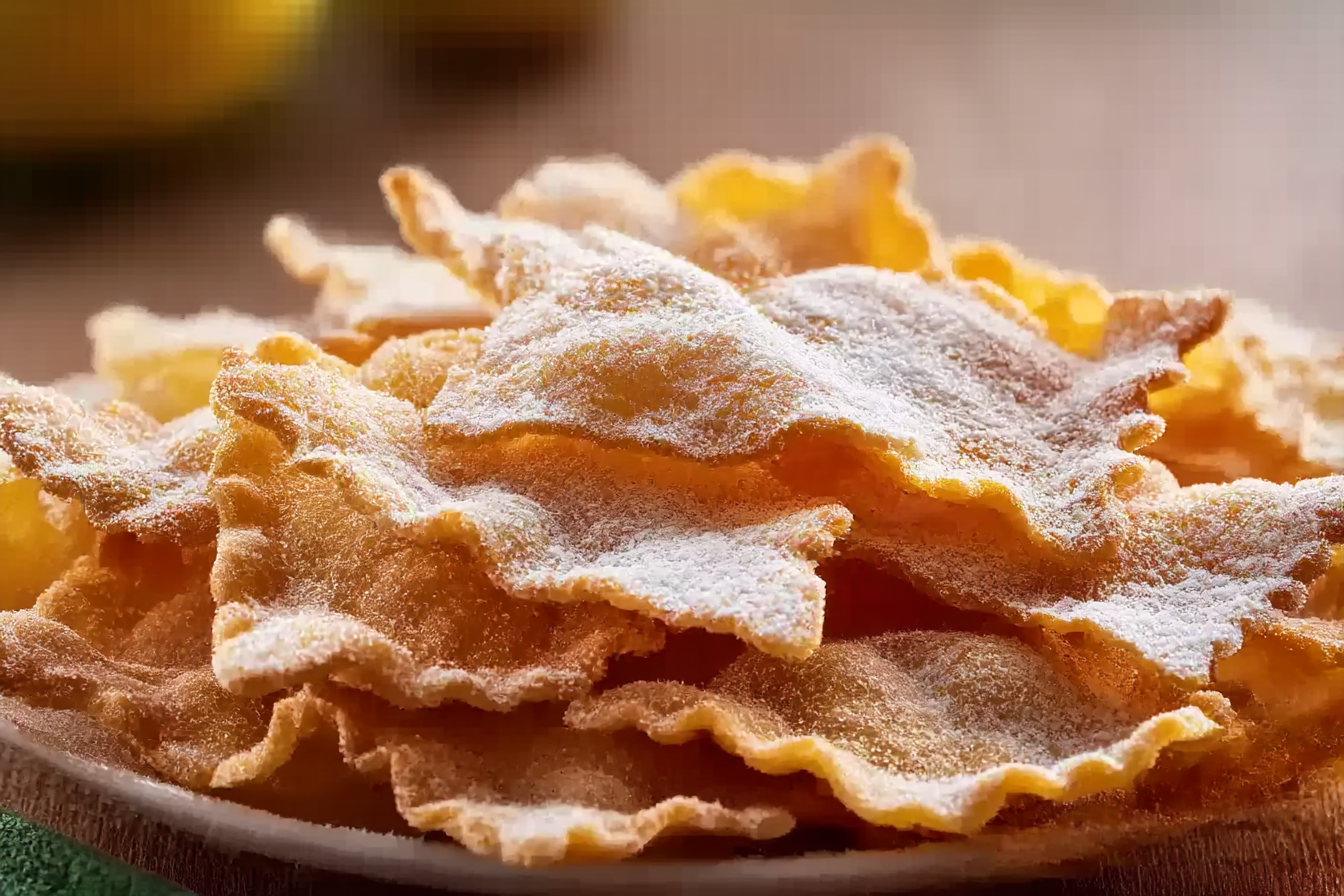
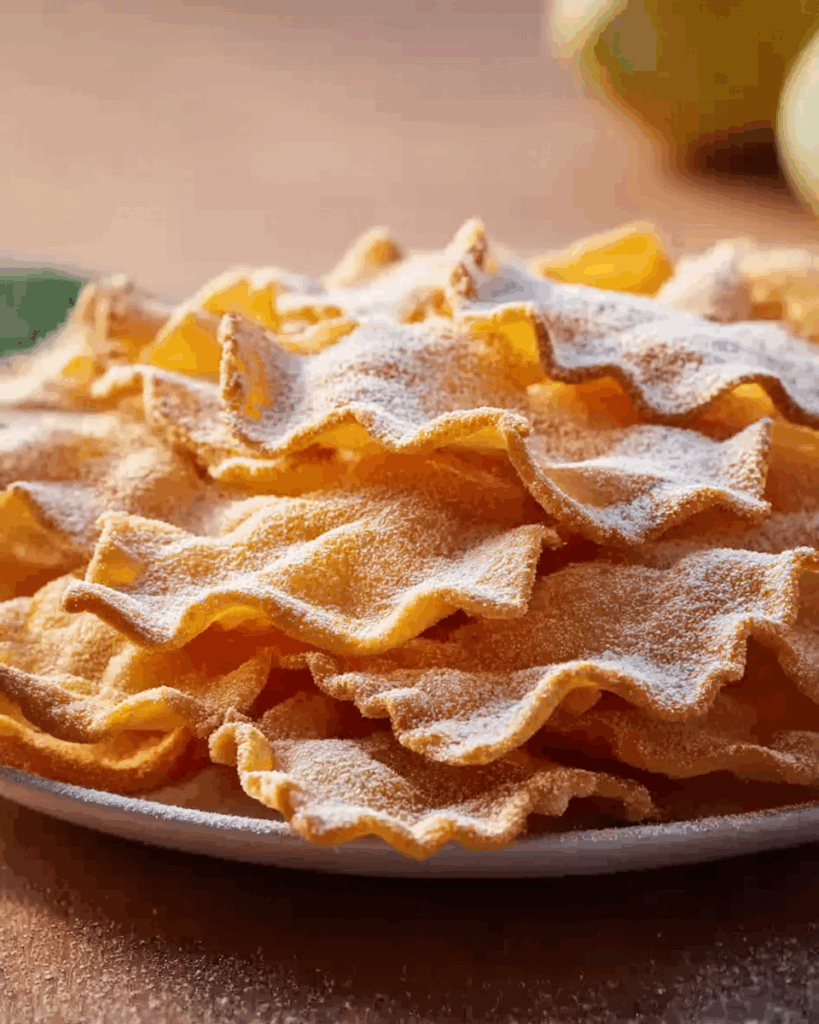
There’s something enchanting about the moment you take your first bite into a piece of Italian Crostoli. Delicately crisp, lightly dusted with powdered sugar, and carrying just a whisper of citrus and vanilla, it’s the kind of treat that feels like a warm hug from a beloved nonna. Whether you’ve tasted them at a festive table or you’re brand new to these golden ribbons of joy, Crostoli has a way of instantly transporting you to the cobblestone streets and rustic kitchens of Italy.
Behind the Recipe
My first memory of Crostoli takes me back to my neighbor’s kitchen on a chilly December afternoon. The scent of frying dough drifted into the hallway, luring me in like a cartoon character drawn by aroma lines. She stood over the stove, apron dusted with flour, gently flipping these fragile pastries with a practiced hand. I watched, wide-eyed, as she smiled and said, “These are Crostoli. In my hometown, we make them for Carnevale, but I make them when the heart needs comforting.” That stuck with me—and so did the recipe.
Recipe Origin or Trivia
Crostoli are a beloved Italian pastry traditionally prepared for celebrations like Carnevale and Christmas. Though they go by many names across regions—like “chiacchiere” in Lombardy or “frappe” in Rome—the heart of the recipe stays the same: thin strips of dough, fried to a delicate crisp, and showered in powdered sugar. This recipe has been handed down through generations, each version carrying a whisper of local flair. Some add citrus zest, others anise, and some prefer a subtle hint of vanilla or wine.
Why You’ll Love Italian Crostoli
Here’s why Crostoli might just become your new favorite go-to treat:
Versatile: You can shape them however you like—twists, ribbons, or simple strips—and adjust flavorings from citrus to vanilla.
Budget-Friendly: Made with pantry staples like flour, eggs, and sugar, this dessert is as affordable as it is delightful.
Quick and Easy: From start to finish, you’ll have golden crostoli in under an hour, making them perfect for last-minute cravings.
Customizable: Add a hint of lemon zest or swap in a splash of orange essence for your own twist.
Crowd-Pleasing: Light, crisp, and sweet—these never last long on the platter.
Make-Ahead Friendly: Make them a day ahead and keep them crisp in an airtight container.
Great for Leftovers: Not that you’ll have many, but they’re still delicious the next day with tea or coffee.
Chef’s Pro Tips for Perfect Results
Creating that signature Crostoli crunch and paper-thin delicacy isn’t hard if you keep these in mind:
- Roll the dough thin: The thinner, the better—use a pasta roller if you have one.
- Oil temperature matters: Keep it at a steady 350°F to avoid greasy or undercooked crostoli.
- Don’t overcrowd the pan: Fry in small batches so each piece crisps evenly.
- Drain properly: Lay fried crostoli on paper towels to soak up excess oil before dusting with sugar.
- Dust while warm: Powdered sugar clings best when the pastries are just slightly warm.
Kitchen Tools You’ll Need
Before you begin, gather these tools to make the process smooth and fun:
Mixing Bowl: For combining and kneading your dough.
Rolling Pin or Pasta Roller: Essential for getting that ultra-thin texture.
Sharp Knife or Pastry Cutter: For shaping the dough into ribbons or strips.
Heavy-Bottomed Pot or Deep Fryer: For frying the crostoli evenly.
Slotted Spoon or Tongs: To flip and retrieve the pastries from the oil.
Cooling Rack or Paper Towels: To let the excess oil drain off.
Sifter or Fine Mesh Strainer: For that final dusting of powdered sugar.
Ingredients in Italian Crostoli
This recipe sings with simplicity, using just a few core ingredients that come together in crisp harmony:
All-Purpose Flour: 2 cups (240g) – Provides structure and the perfect crisp texture when fried.
Eggs: 2 large – Bind the dough and give it richness.
Granulated Sugar: 2 tablespoons – Adds a touch of sweetness to the dough.
Butter: 2 tablespoons, melted – Gives the dough tenderness and flavor.
Vanilla Extract: 1 teaspoon – Enhances the flavor with a warm, sweet aroma.
Lemon Zest: 1 teaspoon – Adds brightness and a subtle citrus note.
Salt: 1/4 teaspoon – Balances sweetness and enhances flavor.
Baking Powder: 1 teaspoon – Helps puff the dough slightly when frying.
Milk: 2 tablespoons (if needed) – To bring the dough together if too dry.
Vegetable Oil: For frying – Neutral oil with high smoke point.
Powdered Sugar: For dusting – The classic sweet finish.
Ingredient Substitutions
Life happens—here’s how to tweak the recipe without losing magic:
Butter: Margarine or vegan butter.
Milk: Plant-based milks like almond or oat.
Lemon Zest: Orange zest or a drop of citrus extract.
Vanilla Extract: Almond extract for a nuttier note.
All-Purpose Flour: Gluten-free flour blend (with xanthan gum).
Ingredient Spotlight
Lemon Zest: This tiny ingredient brings a burst of sunshine to each bite, cutting through the richness and adding brightness.
Vanilla Extract: A little goes a long way, adding depth and warmth to the dough.
Instructions for Making Italian Crostoli
Let’s bring this golden delight to life. Here are the steps you’re going to follow:
1. Preheat Your Equipment:
Start heating your vegetable oil in a heavy-bottomed pot over medium heat to 350°F. Lay out paper towels or a cooling rack for draining.
2. Combine Ingredients:
In a bowl, whisk together flour, sugar, salt, lemon zest, and baking powder. In another bowl, mix eggs, melted butter, and vanilla. Combine wet and dry ingredients to form a smooth dough. Add milk if needed to bring it together.
3. Prepare Your Cooking Vessel:
Ensure your frying pot is stable and your oil remains at 350°F. Keep a thermometer handy for accuracy.
4. Assemble the Dish:
Roll out the dough thinly—really thin—using a rolling pin or pasta machine. Cut into strips, rectangles, or bows using a pastry cutter.
5. Cook to Perfection:
Drop the strips into hot oil a few at a time. Fry until puffed and golden, about 30–45 seconds per side. Remove with a slotted spoon.
6. Finishing Touches:
Drain on paper towels and dust generously with powdered sugar while still warm.
7. Serve and Enjoy:
Pile onto a platter and serve immediately, or store once cooled for later indulgence.
Texture & Flavor Secrets
The magic of Crostoli lies in contrast: whisper-thin crunch meets a feather-light bite, while subtle sweetness from powdered sugar balances the faint zing of citrus and warmth of vanilla. Every bite snaps gently, then melts in your mouth—pure bliss.
Cooking Tips & Tricks
Here are a few extra gems to help you nail it:
- Use a pasta machine to roll dough ultra-thin for professional crispness.
- Sift powdered sugar to avoid clumps and create a snow-like finish.
- Let dough rest 15 minutes before rolling for easier handling.
What to Avoid
Even the best cooks have off days—here’s how to dodge the most common pitfalls:
- Don’t roll the dough too thick—it won’t crisp properly.
- Avoid low oil temps, or the dough will absorb oil and taste greasy.
- Don’t skip the draining step, or your crostoli will turn soggy fast.
Nutrition Facts
Servings: 6–8
Calories per serving: 180
Note: These are approximate values.
Preparation Time
Prep Time: 20 minutes
Cook Time: 20 minutes
Total Time: 40 minutes
Make-Ahead and Storage Tips
Crostoli can be made a day ahead and stored in an airtight container at room temperature. They’ll stay crisp for up to 3 days. Avoid refrigerating—they lose their signature texture. Re-crisp in a warm oven if needed. Freezing is not recommended.
How to Serve Italian Crostoli
Serve Crostoli on a rustic tray or tiered dessert stand, lightly dusted with powdered sugar. Pair with espresso or vin santo, or serve with a drizzle of honey or chocolate for a modern touch.
Creative Leftover Transformations
If you have leftovers, crumble them over gelato for a crunchy topping, use as a layer in parfaits, or dip them in melted chocolate for a gourmet twist.
Additional Tips
- Flavor boost: Add a pinch of nutmeg or cardamom for a cozy spice twist.
- For extra crispiness: Let rolled dough dry slightly before frying.
- Presentation: Tie strips into bows before frying for a festive look.
Make It a Showstopper
Serve Crostoli piled high in a vintage bowl or basket lined with parchment. Garnish with lemon zest curls or edible flowers for a refined presentation. Add a delicate dusting of powdered sugar just before serving for that perfect snow-kissed finish.
Variations to Try
- Chocolate-Dipped Crostoli: Dip cooled pastries halfway into melted dark chocolate and let set.
- Orange Blossom Version: Add a drop of orange blossom water for a floral twist.
- Almond Crostoli: Mix in finely ground almonds for a nutty variation.
- Cinnamon Sugar Crostoli: Toss hot crostoli in cinnamon sugar instead of powdered sugar.
- Mini Crostoli Bites: Cut into small squares for bite-sized treats.
FAQ’s
Q1: Can I bake Crostoli instead of frying?
A1: Yes, but they won’t have the same airy crispness. Bake at 375°F until golden and crisp.
Q2: Can I freeze the dough?
A2: Yes. Wrap tightly in plastic and freeze for up to one month. Thaw before rolling.
Q3: Why is my Crostoli chewy, not crisp?
A3: It might be rolled too thick or fried at too low a temperature.
Q4: Can I make this gluten-free?
A4: Absolutely—use a gluten-free flour blend that includes xanthan gum.
Q5: Do I need a pasta roller?
A5: It helps, but a rolling pin works just fine with a little elbow grease.
Q6: Is it okay to skip the lemon zest?
A6: Sure, but you’ll miss a lovely burst of citrus that lifts the flavor.
Q7: How do I keep Crostoli fresh?
A7: Store in an airtight container at room temperature for up to 3 days.
Q8: Can kids help make Crostoli?
A8: Yes, especially with rolling and shaping—just keep them away from hot oil.
Q9: How do I know oil is ready?
A9: Drop a tiny bit of dough in—if it sizzles and floats, it’s ready.
Q10: Can I double the recipe?
A10: Definitely—just fry in batches and avoid overcrowding the oil.
Conclusion
Crostoli isn’t just a dessert—it’s a celebration of simplicity, tradition, and joy in every bite. Whether you’re making them for a holiday, a gathering, or a quiet evening with tea, these delicate pastries are sure to spark smiles and warm hearts. Trust me, you’re going to love this.
Print
Italian Crostoli
Description
Italian Crostoli are delicate, crispy fried pastries dusted with powdered sugar, traditionally served during festive occasions. Light, crunchy, and subtly sweet, they’re a nostalgic treat straight from Italian kitchens.
Ingredients
- All-Purpose Flour: 2 cups (240g) – Provides structure and the perfect crisp texture when fried.
- Eggs: 2 large – Bind the dough and give it richness.
- Granulated Sugar: 2 tablespoons – Adds a touch of sweetness to the dough.
- Butter: 2 tablespoons, melted – Gives the dough tenderness and flavor.
- Vanilla Extract: 1 teaspoon – Enhances the flavor with a warm, sweet aroma.
- Lemon Zest: 1 teaspoon – Adds brightness and a subtle citrus note.
- Salt: 1/4 teaspoon – Balances sweetness and enhances flavor.
- Baking Powder: 1 teaspoon – Helps puff the dough slightly when frying.
- Milk: 2 tablespoons (if needed) – To bring the dough together if too dry.
- Vegetable Oil: For frying – Neutral oil with high smoke point.
- Powdered Sugar: For dusting – The classic sweet finish.
Instructions
- Preheat Your Equipment: Heat vegetable oil in a heavy-bottomed pot to 350°F and prepare paper towels for draining.
- Combine Ingredients: In a bowl, whisk flour, sugar, salt, lemon zest, and baking powder. In another bowl, mix eggs, melted butter, and vanilla. Combine both mixtures and knead into a smooth dough. Add milk if needed.
- Prepare Your Cooking Vessel: Ensure the pot is stable and oil temperature remains steady at 350°F.
- Assemble the Dish: Roll out the dough very thinly using a rolling pin or pasta roller. Cut into desired shapes.
- Cook to Perfection: Fry in batches until puffed and golden on each side, about 30–45 seconds per side.
- Finishing Touches: Drain on paper towels and dust with powdered sugar while warm.
- Serve and Enjoy: Serve fresh or store once cooled for later indulgence.
Notes
- Use a pasta machine for ultra-thin dough and maximum crispness.
- Let dough rest before rolling to improve texture.
- Store crostoli in an airtight container for up to 3 days.
- Dust with powdered sugar while pastries are still warm.