
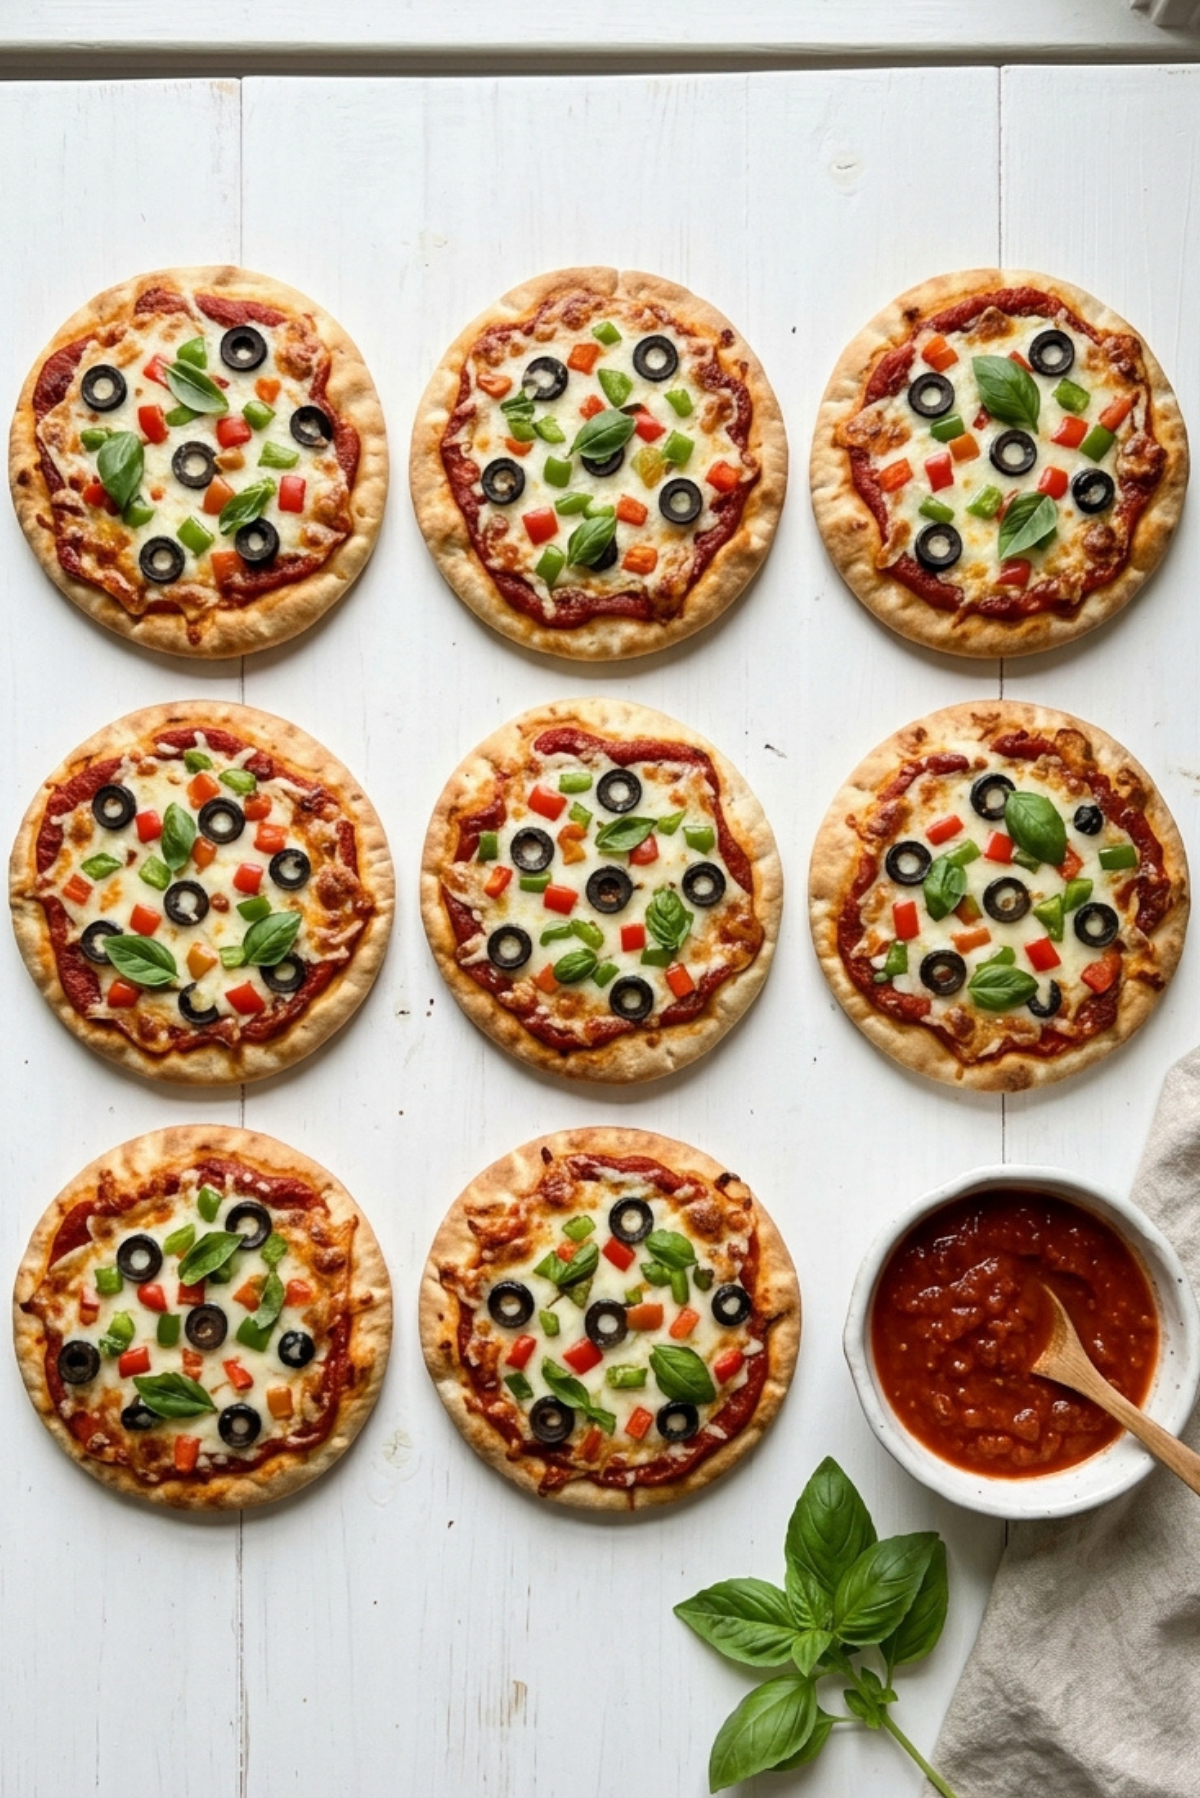
Pita bread pizza is the kind of quick meal that feels almost too easy for how good it tastes. The pita turns golden and crisp around the edges, the tomato sauce gets warm and savory, and the mozzarella melts into that bubbly, stretchy layer everyone loves. Add olives, bell peppers, and basil, and suddenly you have a colorful little pizza that feels fresh, fast, and fun.
Trust me, you’re going to love this because it brings all the cozy pizza flavor without waiting for dough to rise.
Why This Quick Pizza Feels Like a Weeknight Win
This recipe is perfect for the days when you want pizza but not the work that usually comes with it. Pita bread makes the easiest crust because it is already soft, sturdy, and ready to crisp in the oven.
The toppings are simple but full of flavor. The tomato sauce gives that classic pizza base, mozzarella adds creamy richness, olives bring a salty bite, bell peppers add sweetness, and basil makes everything smell fresh and bright.
A Little Story Behind This Easy Flatbread Favorite
Flatbread-style pizzas have been loved for centuries in different parts of the world. Pita bread, with its soft center and lightly chewy texture, makes a natural shortcut for quick homemade pizza.
This modern version became popular because it is fast, kid-friendly, budget-friendly, and endlessly customizable. It gives you that pizza-night feeling with almost no prep.
And honestly, once you try it toasted and bubbling from the oven, it becomes one of those recipes you keep in your back pocket.
Why You’ll Make This Again and Again
Versatile: You can serve it as lunch, dinner, a snack, or slice it into wedges for appetizers.
Budget-Friendly: Pita bread and simple toppings make this easy on the wallet.
Quick and Easy: It comes together in about 20 minutes from start to finish.
Customizable: Change the toppings, cheese, sauce, or seasonings to match your cravings.
Crowd-Pleasing: Everyone loves a personal pizza they can make their own.
Make-Ahead Friendly: You can prep toppings ahead so assembly takes just minutes.
Great for Leftovers: Leftover slices reheat well and make a quick next-day snack.
Smart Tips for Better Pita Pizza
Before you start layering toppings, a few small tricks help everything bake up perfectly.
- Brush the pita lightly with olive oil for a crispier base.
- Do not add too much sauce, or the pita may soften.
- Use low-moisture mozzarella for better melting.
- Bake directly on the oven rack for extra crisp edges.
- Add basil after baking so it stays bright and fresh.
Kitchen Tools You’ll Need
You only need a few basics to make this simple meal.
Baking Sheet: Keeps the pizzas easy to move in and out of the oven.
Pastry Brush: Helps spread olive oil evenly over the pita.
Spoon: Makes it easy to spread the tomato sauce.
Sharp Knife: Helps chop toppings and slice the finished pizzas.
Cutting Board: Keeps prep clean and organized.
Measuring Spoons: Helps season everything evenly.
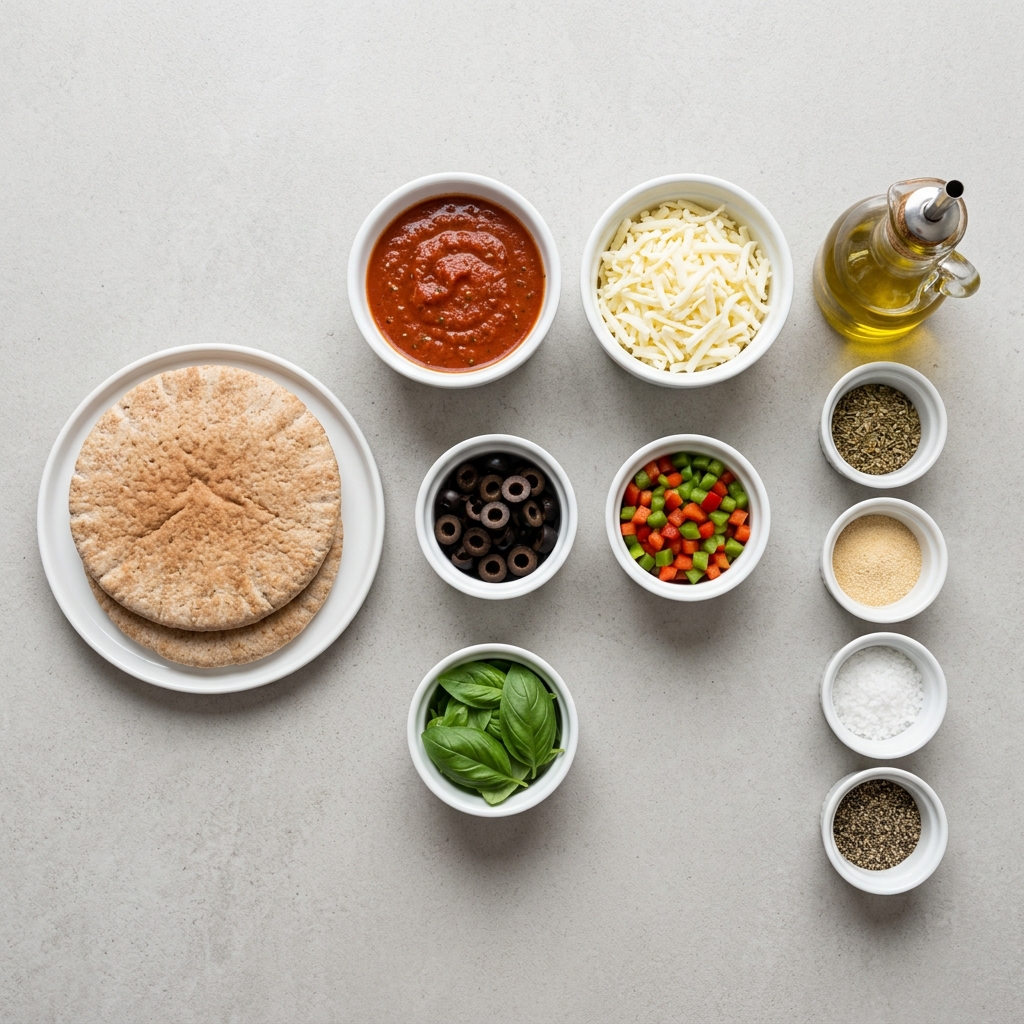
Ingredients You’ll Need for This Easy Pizza
These simple ingredients work together to create a crispy, cheesy, colorful meal.
- Pita Bread: 4 pieces, used as the quick pizza crust.
- Tomato Sauce: 1 cup, adds classic rich pizza flavor.
- Mozzarella Cheese: 2 cups shredded, melts into a creamy bubbly topping.
- Sliced Olives: 1/2 cup, add salty bold flavor.
- Bell Peppers: 1 cup diced, add sweetness, color, and crunch.
- Fresh Basil: 1/4 cup leaves, adds fresh aroma and brightness.
- Olive Oil: 2 tablespoons, helps crisp the pita.
- Italian Seasoning: 1 teaspoon, adds herby flavor.
- Garlic Powder: 1/2 teaspoon, gives savory depth.
- Salt: 1/4 teaspoon, balances the toppings.
- Black Pepper: 1/4 teaspoon, adds gentle spice.
Easy Ingredient Swaps
These little pizzas are easy to adjust based on what you have.
Pita Bread: Naan bread or flatbread.
Mozzarella Cheese: Provolone or Monterey Jack.
Tomato Sauce: Pizza sauce or marinara sauce.
Sliced Olives: Mushrooms or sweet corn.
Bell Peppers: Cherry tomatoes or red onions.
The Ingredients That Make It Shine
Pita Bread: It crisps beautifully while staying sturdy enough to hold toppings.
Mozzarella Cheese: It gives that melty, bubbly pizza texture that makes every bite comforting.
Let’s Make Pita Bread Pizza Step by Step
Now let’s turn those simple ingredients into something warm, cheesy, and so satisfying.
- Preheat Your Equipment: Preheat the oven to 425 degrees Fahrenheit.
- Combine Ingredients: In a small bowl, stir tomato sauce with Italian seasoning, garlic powder, salt, and black pepper.
- Prepare Your Cooking Vessel: Place pita bread on a baking sheet and brush each piece lightly with olive oil.
- Assemble the Dish: Spread tomato sauce over each pita, then top with mozzarella cheese, sliced olives, and diced bell peppers.
- Cook to Perfection: Bake for 8 to 10 minutes, until the cheese is melted and the pita edges are golden and crisp.
- Finishing Touches: Add fresh basil leaves after baking for the best flavor and color.
- Serve and Enjoy: Slice into wedges and serve hot while the cheese is melty and the crust is crisp.
Texture and Flavor That Make Every Bite Fun
The pita gets crisp at the edges while staying slightly tender in the center. The cheese melts into the sauce, the olives add salty little pops, and the bell peppers bring freshness and crunch.
The basil finishes everything with that sweet, peppery aroma that makes the whole pizza feel brighter. Let me tell you, it’s worth every bite.
Cooking Tips and Tricks
- Bake on a hot oven rack for a crispier bottom.
- Keep toppings light so the pita does not get soggy.
- Use freshly shredded cheese for better melting.
- Let the pizza rest for 1 minute before slicing.
What to Avoid for Better Results
- Do not overload the pita with sauce.
- Do not pile on too many wet toppings.
- Do not bake at a low temperature, or the pita may turn soft.
- Do not add basil before baking if you want it fresh and green.
Nutrition Facts
Servings: 4
Calories per serving: Approximately 390
Note: These are approximate values.
Preparation Time
Prep Time: 10 minutes
Cook Time: 10 minutes
Total Time: 20 minutes
Make-Ahead and Storage Tips
You can chop the toppings and mix the sauce ahead of time, then store everything separately in the refrigerator. When you are ready to eat, just assemble and bake.
Leftover slices can be refrigerated in an airtight container for up to 3 days. Reheat in the oven or air fryer to bring back the crisp texture.
Freezing assembled unbaked pita pizzas works too. Wrap them tightly and freeze for up to 2 months.
How to Serve
Serve these pizzas with a simple salad, roasted vegetables, fruit, or soup. They also work great as after-school snacks or party appetizers when sliced into smaller wedges.
For a cozy dinner, pair them with a bowl of tomato soup or a crisp cucumber salad.
Creative Leftover Transformations
Leftover pita pizza can be cut into strips and served as dippers with warm marinara. You can also chop it into bite-sized pieces and add it to a lunchbox with extra veggies.
Another fun idea is to fold a warm slice in half and eat it like a quick pizza sandwich.
Additional Tips
For extra flavor, sprinkle a little parmesan over the mozzarella before baking. A tiny drizzle of olive oil after baking also adds a nice finish.
If you like spice, add a pinch of chili flakes before serving.
Make It a Showstopper
Slice each pita pizza into even wedges and arrange them on a large serving board. Add small bowls of extra tomato sauce nearby for dipping.
A final sprinkle of fresh basil makes the pizzas look colorful, fresh, and ready to serve.
Variations to Try
- Margherita Style: Use tomato sauce, mozzarella, and lots of fresh basil.
- Veggie Loaded: Add mushrooms, onions, and spinach.
- Spicy Version: Add chili flakes and jalapeños.
- Four Cheese: Use mozzarella, parmesan, provolone, and ricotta.
- Mediterranean Style: Add olives, peppers, feta, and fresh herbs.
FAQ’s
1. Can I use naan instead of pita?
Yes, naan works beautifully and gives a softer thicker crust.
2. How do I keep the pita crispy?
Use a hot oven and avoid too much sauce.
3. Can I make these ahead?
Yes, assemble and refrigerate for a few hours before baking.
4. Can I freeze pita pizzas?
Yes, freeze unbaked pizzas tightly wrapped for up to 2 months.
5. What cheese works best?
Low-moisture mozzarella melts best and keeps the crust from getting soggy.
6. Can I make this in an air fryer?
Yes, air fry at 375 degrees Fahrenheit for 5 to 7 minutes.
7. Is this recipe vegetarian?
Yes, this version is vegetarian.
8. Can kids help make these?
Yes, they can spread sauce and add toppings easily.
9. What sauce should I use?
Tomato sauce, pizza sauce, or marinara all work well.
10. How do I reheat leftovers?
Reheat in the oven or air fryer until warm and crisp.
Conclusion
Pita bread pizza is quick, cozy, crispy, and endlessly customizable. It gives you all the comfort of pizza with barely any prep, which makes it perfect for busy days, casual dinners, and fun family meals. Once you pull those bubbling cheesy pitas from the oven, you’ll see why this simple recipe deserves a regular spot in your kitchen.
Print
Pita Bread Pizza
Description
Quick and crispy pita pizzas topped with tomato sauce, melted mozzarella, olives, bell peppers, and fresh basil for an easy homemade pizza night.
Ingredients
- 4 pieces pita bread
- 1 cup tomato sauce
- 2 cups shredded mozzarella cheese
- 1/2 cup sliced olives
- 1 cup diced bell peppers
- 1/4 cup fresh basil leaves
- 2 tablespoons olive oil
- 1 teaspoon Italian seasoning
- 1/2 teaspoon garlic powder
- 1/4 teaspoon salt
- 1/4 teaspoon black pepper
Instructions
- Preheat the oven to 425 degrees Fahrenheit.
- In a small bowl, stir tomato sauce with Italian seasoning, garlic powder, salt, and black pepper.
- Place pita bread on a baking sheet and brush each piece lightly with olive oil.
- Spread tomato sauce over each pita.
- Top with mozzarella cheese, sliced olives, and diced bell peppers.
- Bake for 8 to 10 minutes, until the cheese is melted and the pita edges are golden and crisp.
- Add fresh basil leaves after baking.
- Slice into wedges and serve hot.
Notes
- Use low-moisture mozzarella for the best texture.
- Do not add too much sauce, or the pita may soften.
- Add basil after baking so it stays fresh and bright.
- Reheat leftovers in the oven or air fryer for crispiness.